
Voltage, Watts, Ohms: Vape Settings Explained


Most vape setting mistakes come from one simple mix-up: resistance is not your setting – wattage usually is, a common mistake when understanding vape device types.
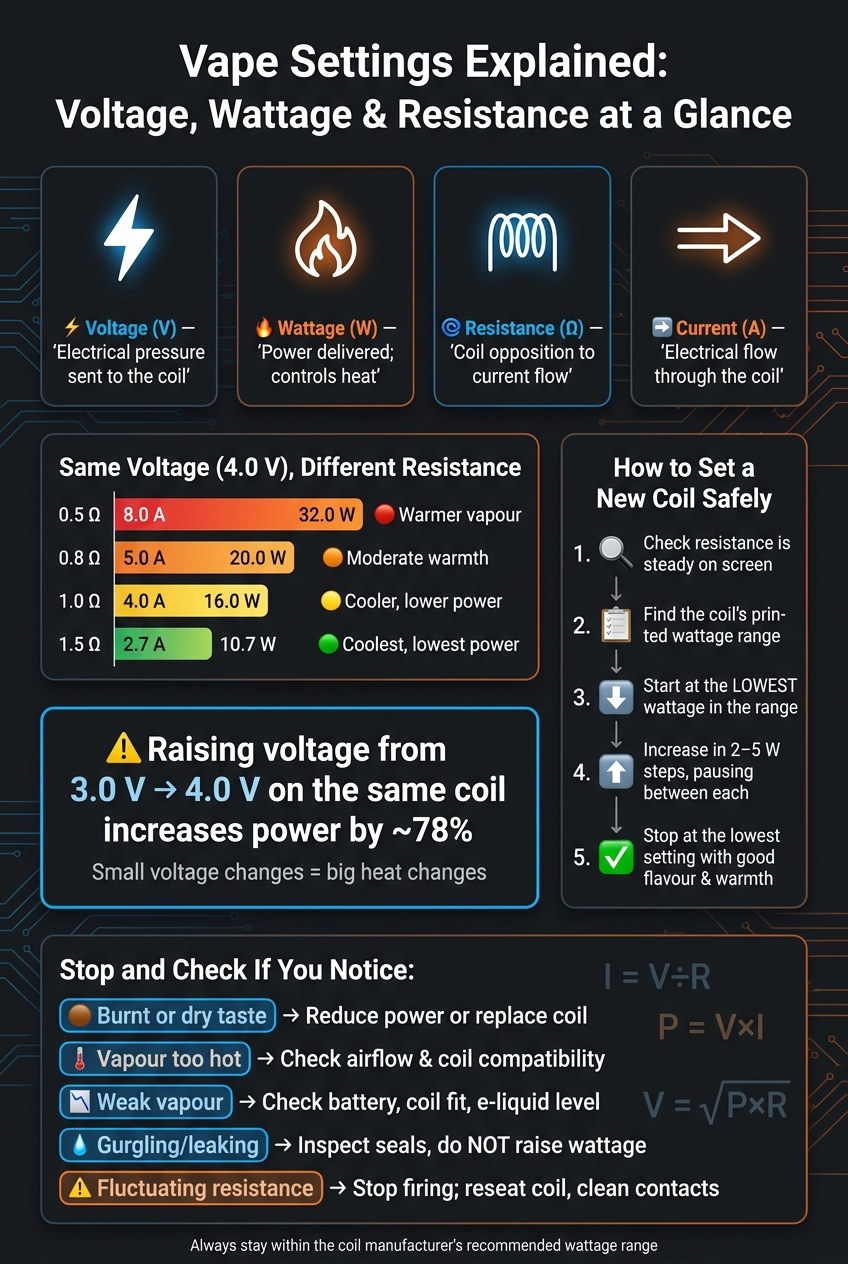
If I want a safe starting point, I check the coil’s printed wattage range, start at the lowest number, and move up in 2–5 W steps. I also make sure the resistance reading on the screen is steady. If it jumps, I stop and check the coil before changing anything.
Here’s the short version:
- Voltage (V) = electrical pressure
- Resistance (Ω) = how much the coil resists current
- Current (A) = electrical flow
- Wattage (W) = heat sent to the coil
A few numbers show why this matters:
- At 4.0 V with a 0.5 Ω coil, the load is 32 W and 8.0 A
- At 4.0 V with a 1.0 Ω coil, the load is 16 W and 4.0 A
- Moving from 3.0 V to 4.0 V on the same coil lifts power by about 78%
That means even a small voltage change can make the vape much hotter.
What I’d keep in mind first:
- Use the coil’s rated wattage range
- Start low
- Increase in small steps
- Check for burnt taste, too much heat, or unstable resistance
- If resistance keeps shifting, treat it as a hardware problem, not a power problem
Vape Settings Explained: Voltage, Wattage & Resistance at a Glance
Vaping 101: OHMs, Watts, and Voltage Explained for Beginners
sbb-itb-837e7ad
Quick comparison
| Term | What it means | What happens when it goes up |
|---|---|---|
| Voltage | Pressure sent to the coil | More current and more heat on the same coil |
| Wattage | Power at the coil | Hotter vape and more e-liquid use |
| Resistance | Coil opposition to current | Higher resistance usually means less current at the same voltage |
| Current | Electrical flow | More battery load |
In short, I’d read the coil label first, use wattage as my main control on a regulated device, and let the maths help me check the load instead of guessing.
How Voltage, Wattage and Resistance Interact on a Regulated Device
The four measurements from the previous section don’t act on their own – they move together. On a regulated device, the chipset does the maths for you, but the relationship between the numbers stays the same.
At a fixed voltage, resistance is the main thing that controls how much current flows and how much power reaches the coil. At 4.0 V, a 0.5 Ω coil draws 8.0 A and gets 32 W, while a 1.0 Ω coil at the same voltage draws only 4.0 A and gets 16 W. That lower-resistance coil puts a heavier load on the coil, heats harder, gives warmer vapour, and uses e-liquid at a much faster rate. The higher-resistance coil runs cooler, pulls less current, and gives a more restrained vape. Neither setup is automatically better – it comes down to the coil design and what you like. That’s the starting point before voltage changes enter the picture.
Power goes up with the square of voltage, which means even a small increase in voltage can push wattage up fast. Move from 3.0 V to 4.0 V on the same coil, and power rises by about 78%. That’s not just a little more – it’s close to double. In day-to-day use, the coil heats faster, vapour gets warmer, and e-liquid use climbs. Push it too far, and the wick may not keep up, which can lead to a dry or burnt taste.
In variable-wattage mode, you set the power and the device supplies the voltage the coil needs. To deliver 25 W to a 0.5 Ω coil, the device applies about 3.54 V. To deliver that same 25 W to a 1.0 Ω coil, it applies 5.0 V. Same wattage, different voltage at the coil. The next step is matching those numbers to a new coil safely.
Comparison Table: Voltage, Wattage, Resistance and Current
| Measurement | Unit | What it represents | Effect of changing it | Compatibility and safety |
|---|---|---|---|---|
| Voltage | Volt (V) | Electrical pressure applied to the coil | Higher voltage increases current, heat and vapour on the same coil | Must stay within the device and coil’s operating limits |
| Wattage | Watt (W) | Power delivered to the coil | Higher wattage increases heat, vapour warmth and e-liquid use | Stay within the coil manufacturer’s recommended range and the device’s maximum output |
| Resistance | Ohm (Ω) | The coil’s opposition to current flow | Lower resistance draws more current at a fixed voltage; higher resistance draws less | Must be supported by the mod; unstable readings need checking |
| Current | Ampere (A) | Electrical flow through the coil | Increases when voltage rises or resistance falls | Battery load also depends on the mod’s board and battery setup. |
These numbers show the load. The next section gets into how to set them safely.
Ohm’s law tells you the electrical load, but coil size and airflow still shape how the vape feels.
Vape Maths Made Simple: Clear Examples
Example Calculations at a Fixed Voltage
The formulas above click into place once you put real numbers on them. At 4.0 V, a 1.0 Ω coil draws 4.0 A and uses 16 W. That comes from I = V ÷ R and P = V × I. Switch to a 0.5 Ω coil at that same 4.0 V, and current jumps to 8.0 A while power climbs to 32 W. In plain terms, when voltage stays the same, cutting resistance in half doubles both current and power.
That means more heat, more strain on the battery, and quicker e-liquid use.
Calculation Table: Resistance, Voltage, Current and Power
The table below compares fixed 4.0 V readings across different resistances, then fixed 1.0 Ω readings across different wattages. These figures are examples only.
Fixed voltage (4.0 V), varying resistance:
| Resistance | Current (I = V ÷ R) | Power (P = V² ÷ R) | Typical result |
|---|---|---|---|
| 0.5 Ω | 8.0 A | 32.0 W | Warmer vapour |
| 0.8 Ω | 5.0 A | 20.0 W | Moderate warmth |
| 1.0 Ω | 4.0 A | 16.0 W | Cooler, lower power |
| 1.5 Ω | 2.7 A | 10.7 W | Cooler still, lower vapour potential |
The next table shows what happens when the same coil is pushed to higher wattage.
Fixed resistance (1.0 Ω), varying wattage:
| Power setting | Approx. voltage (V = √(P × R)) | Approx. current (I = P ÷ V) | Typical result |
|---|---|---|---|
| 10 W | 3.16 V | 3.16 A | Cooler, lighter vapour potential |
| 15 W | 3.87 V | 3.87 A | Moderate warmth |
| 20 W | 4.47 V | 4.47 A | Warmer, denser vapour potential |
| 25 W | 5.00 V | 5.00 A | Higher heat; only within the coil’s rated range |
Wicking speed, airflow, and coil construction can push the result either way.
Why Resistance Matters Beyond the Number on Screen
These figures show electrical load, but they don’t tell the whole story. A mod screen can show the same number for two coils, yet the vape can still feel different. Two 0.8 Ω coils, for example, may not heat in the same way because heat can spread across the coil body differently. That often changes how even the heating feels and how clear the flavour comes through at the same wattage.
Resistance is only one part of the picture. Coil design, wick speed, airflow, and PG/VG ratio all shape the final result. So it helps to use resistance as a guide for load, then adjust wattage within the coil’s rated range. Following a beginner’s safety guide can help you navigate these adjustments without damaging your hardware.
How to Set Wattage and Check Coil Load Safely
A Step-by-Step Method for Setting a New Coil
Once the numbers line up, the safest move is to match them with the coil label.
Before you change anything, check that the resistance on the screen is steady and close to the value printed on the coil or its box. If the reading jumps around, or the device shows a Check Resistance message, inspect the coil and contacts, then reinstall the tank or pod before touching the wattage.
When the reading is stable, start at the lowest wattage in the printed range. If the coil says 40–60 W, start at 40 W. Take a short test puff and see how the warmth and flavour feel. If it seems too cool or weak, go up in small steps of 2–5 W at a time. Pause between changes so the wick can soak again. Stop at the lowest wattage that gives you balanced flavour and warmth.
Watch for warning signs while you test:
- Burnt taste or a dry hit
- Vapour that feels unusually hot
- A resistance reading that starts shifting without warning
If the wick is scorched, lowering the wattage won’t solve it. In most cases, the coil needs to be replaced.
Variable Wattage, Variable Voltage and Temperature Control: Key Differences
After the coil is installed, the control mode on your vape mod determines how the device delivers power.
| Mode | User-controlled value | Device regulation | When resistance changes matter | Main setting consideration | Common user error |
|---|---|---|---|---|---|
| Variable wattage | Power in watts | Adjusts voltage to hit the selected power | The device accounts for resistance, but a major resistance change still needs inspection | Stay within the coil’s recommended wattage range | Setting power too high just because the device allows it |
| Variable voltage | Voltage in volts | Adjusts output to the selected voltage | Resistance changes alter wattage and current directly | Recalculate or monitor power when resistance changes | Assuming the same voltage always gives the same vape |
| Temperature control | Temperature and often a power ceiling | Modulates power using resistance changes | Resistance accuracy and the correct wire profile are key | Use the correct coil material and manufacturer settings | Using incompatible wire or locking an incorrect room-temperature resistance |
Variable wattage is usually the easiest mode to use because the mod handles voltage for you. Variable voltage puts more of the work on the user. Temperature control needs a coil material that supports it, such as stainless steel, nickel, or titanium, plus a correct room-temperature resistance reading. Use the wrong wire type and you’ll likely get poor heating or dry hits.
Coil Load, Battery Demand and Device Checks
The number on the screen doesn’t tell the whole battery story.
Battery draw goes up as battery voltage drops, so CDR matters more than the coil’s displayed current on its own. For mechanical or direct-battery calculations, always use 4.2 V as the worst-case starting voltage. A 0.20 Ω coil at 4.2 V draws about 21 A and produces around 88.2 W before any voltage sag. The battery’s CDR needs to sit well above that figure.
Regulated devices include electronic protections that may help with short circuits, over-current, over-temperature, and low-voltage conditions. Even so, those protections do not make a damaged, torn, or mismatched battery safe to use.
Troubleshooting Common Setting Problems and Key Takeaways
What Burnt Taste, Weak Vapour and Unstable Resistance Usually Mean
If your setting looks right but the vape still feels off, the symptom often tells you what’s wrong.
| Symptom | Most likely cause | First response |
|---|---|---|
| Burnt or dry hit | Excessive wattage, dry or unprimed wick, low e-liquid, old coil | Stop firing; check liquid level and wick saturation; reduce power; replace coil if taste remains |
| Weak vapour | Wattage too low, low battery, poor coil connection, restricted airflow, low e-liquid | Check charge, coil fit, e-liquid level and airflow; raise power gradually within the printed range |
| Too hot | Too much power, blocked airflow, incompatible coil | Stop, allow the device to cool, check airflow openings and coil compatibility |
| Gurgling or leaking | Flooded coil, condensation, damaged seal, incorrect assembly | Inspect seals and assembly; remove excess liquid; avoid raising wattage as a first response |
| Fluctuating resistance | Loose coil, dirty or wet contacts, incompatible coil | Stop firing; remove and reinstall the coil; clean contacts; seek support if unresolved |
The main point is simple: match the fix to the symptom. Don’t treat power as the default answer for every problem. A burnt hit, a leak, and a shifting resistance reading do not point to the same issue.
Fluctuating resistance should be treated as a hardware fault. Turn the device off, reseat the coil, wipe the contacts, and make sure the coil is the correct model for your device. If the reading keeps shifting, or the device continues to show error messages, stop using that setup and check the device manual.
Conclusion: The Simplest Rules for Reading Vape Settings Correctly
When a symptom shows up, start with the simplest fix, as outlined in our guide for first-time users.
Begin at the coil’s minimum wattage. Then move up in small steps of 2–5 W, watching how the vapour and warmth change. Stop at the lowest setting that gives you good flavour and vapour.
Also make sure your coil, tank or pod, device, and battery all match. Follow essential vape safety tips and use only the battery type and charger named by the manufacturer. And if the device shows repeated error messages, unusual heat, or resistance changes you can’t explain, stop firing it.
FAQs
Why is wattage usually the main setting?
Wattage is usually the main setting because it controls the power sent to the coil. That power affects how fast the e-liquid turns into vapour.
Change the wattage, and you change the feel of the vape. Lower settings can give you a cooler, lighter puff. Higher settings can make the vapour warmer, denser, and more intense.
It’s also smart to stay within your coil’s recommended wattage range. Go too low, and you may end up with flooding and leaking. Push it too high, and you risk burnt hits and a shorter coil life.
How do I know if my coil resistance is normal?
Check the resistance rating printed on the side or bottom of the coil, then compare it with the manufacturer’s specs for your device.
Many modern devices can detect coil resistance on their own and set a suitable wattage. If you notice a burnt taste, muted flavour, or less vapour, the coil may be worn out and need replacing.
When should I stop using a coil or device?
Replace your coil or pod when the flavour starts to fade, the vapour gets lighter, or you notice a burnt taste. Those are usually clear signs that the wick has worn down or the coil is nearing the end of its life.
You should also swap it out if your e-liquid turns darker inside the pod or the flavour suddenly feels flat. In most cases, coils last 5 to 14 days, depending on how often you vape, the type of e-liquid you use, and your power settings.
Related Blog Posts
- Best Wattage for MTL vs. DTL Vaping
- What Is Coil Resistance in Vaping?
- Checklist for Cloud Chasing Competitions
- Coil Resistance and Its Impact on Vaping
{“@context”:”https://schema.org”,”@type”:”FAQPage”,”mainEntity”:[{“@type”:”Question”,”name”:”Why is wattage usually the main setting?”,”acceptedAnswer”:{“@type”:”Answer”,”text”:”Wattage is usually the main setting because it controls the power sent to the coil. That power affects how fast the e-liquid turns into vapour. Change the wattage, and you change the feel of the vape. Lower settings can give you a cooler, lighter puff. Higher settings can make the vapour warmer, denser, and more intense. It’s also smart to stay within your coil’s recommended wattage range. Go too low, and you may end up with flooding and leaking. Push it too high, and you risk burnt hits and a shorter coil life.”}},{“@type”:”Question”,”name”:”How do I know if my coil resistance is normal?”,”acceptedAnswer”:{“@type”:”Answer”,”text”:”Check the resistance rating printed on the side or bottom of the coil, then compare it with the manufacturer’s specs for your device. Many modern devices can detect coil resistance on their own and set a suitable wattage. If you notice a burnt taste, muted flavour, or less vapour, the coil may be worn out and need replacing.”}},{“@type”:”Question”,”name”:”When should I stop using a coil or device?”,”acceptedAnswer”:{“@type”:”Answer”,”text”:”Replace your coil or pod when the flavour starts to fade, the vapour gets lighter, or you notice a burnt taste. Those are usually clear signs that the wick has worn down or the coil is nearing the end of its life. You should also swap it out if your e-liquid turns darker inside the pod or the flavour suddenly feels flat. In most cases, coils last 5 to 14 days, depending on how often you vape, the type of e-liquid you use, and your power settings.”}}]}
Frequently Asked Questions
Start with the lowest wattage shown in the coil’s printed wattage range, then increase in small steps of 2–5 W. Stop if the vape tastes burnt, becomes too hot, or the resistance reading is unstable.
No. Resistance, measured in ohms (Ω), describes how much the coil resists current, while wattage measures the power sent to the coil. The coil’s rated wattage range is the main guide for adjusting power.
Voltage is the electrical pressure sent to the coil, while wattage is the power converted into heat. On the same coil, increasing voltage can raise the heat significantly; for example, moving from 3.0 V to 4.0 V increases power by about 78%.
A 0.5 Ω coil has lower resistance than a 1.0 Ω coil, so the same voltage produces more power and current. At 4.0 V, the provided example shows a 0.5 Ω coil drawing 32 W and 8.0 A.
Stop changing the power setting and check the coil or device connection. An unstable resistance reading should be treated as a hardware problem rather than corrected by increasing or lowering wattage.
Use the coil’s printed wattage range and begin at its lowest number. Increase by only 2–5 W at a time, stopping if a burnt taste or excessive heat appears.
Ohm’s law explains the relationship between voltage, resistance, and current, while wattage describes the power delivered to the coil. These values help explain why a lower-resistance coil can draw more current and produce more heat at the same voltage.
VapeShop.Product and setting questions can also be sent through WhatsApp at +973 66324432.