
How to Prime Pod Coils for Longer Use


A new pod coil can taste burnt in the first puff if I rush it. The fix is simple: wet the wick, fill the pod the right way, wait 5–10 minutes, and start at low power. That short routine helps cut dry hits, wasted e-liquid, and early coil failure.
Here’s the full idea in plain terms:
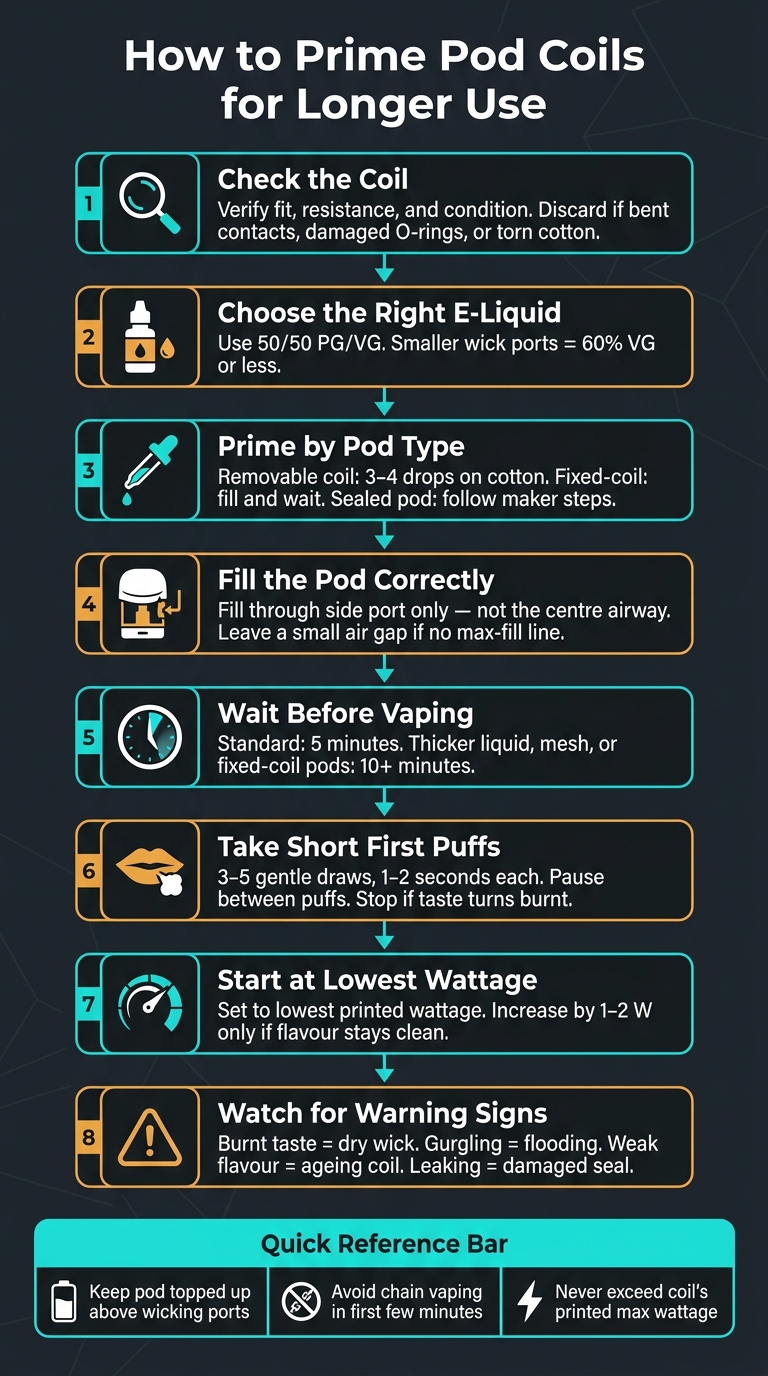
- Check for the best vape coils first: I make sure it matches the pod, sits properly, and has no bent parts or damaged seals.
- Use the right e-liquid: Many pods work best with 50/50 PG/VG, and smaller wick ports often need 60% VG or less.
- Prime by pod type:
- removable coil: add 3–4 drops to the exposed cotton
- fixed-coil pod: fill and wait
- sealed pod: follow the maker’s steps
- Fill carefully: I fill through the side port, not the centre tube, and leave a small air gap if there’s no max line.
- Wait before vaping: at least 5 minutes, or 10+ minutes for thicker liquid, mesh coils, or fixed-coil pods.
- Take short first puffs: about 1–2 seconds each, with pauses between them.
- Keep wattage low at first: if the device is adjustable, I start at the lowest printed wattage and move up by 1–2 W only if the flavour stays clean.
- Watch for warning signs: burnt taste, gurgling, spitback, leaking, or weak flavour usually point to dry cotton, flooding, wrong liquid, or a worn coil.
A few small mistakes can ruin a coil early. But if I keep the pod topped up, avoid chain vaping at the start, and stay inside the coil’s printed power range, the coil will usually last longer and taste cleaner from day one.
How to Prime Pod Coils: Step-by-Step Guide
How to prime a vape coil (atomizer) in 2 minutes
sbb-itb-837e7ad
Prepare the pod, coil, and e-liquid
Before filling the pod, pause for a quick check of the coil and the e-liquid you’re about to use. These two things matter more than many people think. Coil fit and liquid thickness both affect how fast the wick soaks up e-liquid, and that can be the difference between a smooth first puff and a burnt one.
Check coil fit, resistance, and condition
First, make sure the replacement coil is made for your exact pod model. Coils can look almost the same and still behave very differently. If a coil doesn’t sit properly, it can lead to leaking, uneven heating, or dry puffs.
You’ll also want to match the coil resistance to the wattage range recommended by the device maker. If there’s a rating printed on the coil, treat that as the main guide.
Give the coil and cotton a quick visual check before use. The cotton should look intact and evenly packed. It shouldn’t be torn, darkened, dry, or squashed down. Also bin any coil that has:
- Bent contacts
- Damaged O-rings
- Loose parts
- Package residue
If the cotton is damaged from the start, the coil may taste burnt on the very first puff.
Once the coil is fitted properly and the liquid suits the pod, you can move on to filling.
Use an e-liquid the pod can wick properly
Pods with smaller wick ports tend to work better with thinner e-liquids. Thicker liquid moves through cotton more slowly. And if the coil heats up before the wick has soaked up more liquid, you can end up with a harsh, burnt hit.
A 50/50 PG/VG blend is a solid place to start. Some pods can handle a slightly thicker mix, but coils with smaller wicking ports are often best kept at 60% VG or less, based on maker guidance. If your pod isn’t rated for high-VG liquid, stick with the thinner option.
Nicotine salts and freebase e-liquids are used in different setups; salts are often used in higher-resistance, lower-power pods, but that doesn’t mean they suit every coil. A low-resistance coil can make salt nicotine feel harsh. In Bahrain, nicotine strength must stay within the 20 mg/ml limit. Check the bottle label and your device instructions before you fill the pod.
How to prime and fill the pod
Prime and fill the pod in this order to avoid flooding or a dry first puff. Get the coil ready first, then fill the pod.
Saturate a removable coil without flooding it
If the coil is removable, add 3–4 drops to the exposed cotton before you fit it. You want the cotton to look damp and a bit translucent, not drenched.
Keep e-liquid out of the centre airflow tube. If liquid goes into that tube, it can lead to gurgling or spitback. Once the cotton looks evenly damp, press the coil firmly into the pod so it sits in place properly. Don’t overtighten it. Too much force can damage the coil, pod threads, or sealing surfaces.
For fixed-coil pods, just fill the pod and let it soak.
Fill the pod through the correct port
Open the fill port and place the bottle nozzle into that port only, not the centre airway. Point the nozzle at the inner wall and fill slowly to cut down on bubbles.
Stop at the maximum-fill line. If there isn’t a visible line, leave a small air gap at the top. Then close the plug firmly and wipe the mouthpiece, fill area, and contacts with a clean, dry tissue.
How long to wait before your first puff
After filling, leave the pod upright so the wick can absorb the liquid fully. Wait at least 5 minutes. Give it 10 minutes or more if you’re using thicker liquid, mesh coils, or fixed-coil pods. If your device manual says something else, follow that instead.
Don’t take a puff too early. The wick needs time to soak up the liquid, and rushing this step is one of the most common reasons a brand-new coil tastes burnt from the very first draw.
Take the first puffs at low power
After the soak time, don’t go full tilt straight away. Start with short, light puffs so the wick has time to keep up. Those first few draws matter a lot. They often decide whether the coil beds in properly or gets singed early.
Use gentle primer pulls and short first draws
Once the coil is soaked, start gently. If your device lets air pass through the mouthpiece without firing the coil, take two or three gentle, brief primer pulls before firing. That helps pull e-liquid into the wick. Keep it light, though. Hard or repeated pulls can push too much liquid into the coil chamber, which can lead to gurgling, spitback, or a wet, weak draw.
When you do fire the device, start with three to five short, gentle draws, each lasting about 1–2 seconds, with a brief pause between them. If the flavour turns dry, harsh, or burnt at any point, stop at once. Let the pod sit a bit longer, then check the e-liquid level before trying again. Also, avoid chain vaping in the first few minutes, because repeated firing can use liquid faster than the wick can pull it in.
Start at the lowest recommended wattage
If those first puffs taste clean, only increase power in small steps. On an adjustable device, set the wattage to the lowest number in the coil’s recommended range before your first puff. If the flavour stays clean and the wick remains wet, turn the power up slowly – usually by 1–2 W per adjustment – and take several puffs at each setting before going higher. Stop when the flavour stays clean and the vapour feels warm rather than harsh. Never go past the coil’s printed maximum.
If your pod doesn’t let you change wattage, use the device’s automatic low-power mode or default setting, if it has one, and keep your draws short and gentle. Some automatic pods handle output for you, so it’s best to stick with the default.
Use the matching start-up approach below.
| Device type | First-use approach | What to watch for |
|---|---|---|
| Adjustable wattage | Start at the lowest printed wattage; increase by 1–2 W at a time | Burnt taste or fast liquid loss means power is too high |
| Auto-draw | Use short, gentle draws with pauses | Hard pulls can flood the coil or trigger the sensor |
| Fixed-coil pod | Use the device default; no wattage adjustment needed | Gurgling or spitback points to flooding, not a power issue |
Avoid burnt taste and know when to replace the coil
Once the pod is primed and the first few puffs feel fine, the next step is simple: avoid dry hits and catch coil wear before it gets worse.
Mistakes that burn pod coils early
A few common slip-ups can burn a pod coil much sooner than expected. The big one is letting the e-liquid drop below the wicking ports. When the cotton dries out, it scorches fast, and that burnt taste tends to hang around.
Other common causes include:
- Using e-liquid that’s too thick for the pod
- Overfilling the chamber
- Installing a removable coil the wrong way or not pushing it in fully
Overfilling can flood the chamber, which often leads to gurgling or spitback. A removable coil that isn’t seated all the way can heat unevenly and wick poorly. In most cases, these problems are easy to avoid if you keep the pod topped up and make sure the wick can feed liquid properly.
Basic maintenance and troubleshooting checks
Check the pod often, and top it up before the liquid falls below the wicking ports. If you spot condensation or small leaks, wipe the pod base and contacts with a clean, dry cloth. It’s also smart to store the device upright. If the vapour starts to feel dry or weak, wait 10–15 seconds between puffs.
Use this quick check if flavour drops, the draw feels different, or the pod starts leaking.
| Symptom | Common cause | Next step |
|---|---|---|
| Burnt taste | Dry wick or worn coil | Stop vaping; top up the pod, lower power, and let the wick rest. Replace the coil if the taste stays. |
| Gurgling or spitback | Overfilling, excess liquid in the airway, or a poorly seated coil | Do not increase wattage; wipe the pod and contacts dry, check the fill level and coil fit, then take a gentle draw. |
| Weak flavour | Low battery, flooded coil, or an ageing coil | Check battery, liquid level, airflow, and wattage; clean contacts, and replace the coil if flavour doesn’t recover. |
| Leaking | Damaged seal, loose coil, overfilling, or storing on its side | Stop use if liquid reaches the electronics; wipe dry, reseat or replace the faulty pod or coil, and store upright. |
| Dry draws after several puffs | Low pod level, thick e-liquid, or power set too high | Pause between puffs, top up the pod, reduce wattage, and switch to a thinner liquid ratio if dry hits continue. |
If the burnt taste goes away after letting the pod rest, you likely had a dry hit. If the taste stays even after topping up and lowering the power, the cotton is scorched and the coil needs replacing.
Conclusion: the routine for longer coil life
Prime the coil the right way, keep the liquid above the wicking ports, stay within the coil’s power limits, and replace the coil if the burnt taste doesn’t go away. For pods, coils, e-liquids, and accessories in Bahrain, VapeShop.bh offers same-day delivery across Bahrain and ordering via WhatsApp.
FAQs
Can I prime a coil without removing it?
Yes. Fill the pod, then leave it for 5 to 15 minutes so the wick has time to soak up the e-liquid.
You can also take a few light draws through the mouthpiece without firing the device. That helps pull e-liquid into the coil.
For the best start with a brand-new coil, add a few drops of e-liquid directly to the exposed cotton ports before installation.
How do I know if my e-liquid is too thick?
If your e-liquid is too thick for your coil, you might notice weak hits or slow wicking. It just can’t move through the wick fast enough. And that often leads to a dry or burnt taste.
A simple fix is to match the liquid to the coil. Use thinner 50/50 blends for higher-resistance MTL coils, and thicker high-VG liquids for sub-ohm coils with larger wicking ports.
Will one dry hit ruin a new pod coil?
Yes – one dry hit can wreck a new pod coil. Once the cotton burns, that burnt taste can stick around. And when that happens, you may keep tasting scorched cotton even after you top up the pod.
To help avoid that, prime the coil first. Add a few drops of e-liquid to the exposed cotton, then fill the pod and let it sit for 5 to 10 minutes. If it’s a brand-new coil, give it 10 to 15 minutes instead.
If you still get a dry hit, stop vaping straight away and wait a bit. If the burnt taste doesn’t go away, replace the coil.
Related Blog Posts
- How to Replace Coils in Pod Systems
- How to Store Coils to Avoid Burnt Taste
- How to Prime Pod Coils and Avoid Mistakes
- How to Prime Vape Coil and Stop Dry Hits
{“@context”:”https://schema.org”,”@type”:”FAQPage”,”mainEntity”:[{“@type”:”Question”,”name”:”Can I prime a coil without removing it?”,”acceptedAnswer”:{“@type”:”Answer”,”text”:”Yes. Fill the pod, then leave it for 5 to 15 minutes so the wick has time to soak up the e-liquid. You can also take a few light draws through the mouthpiece without firing the device. That helps pull e-liquid into the coil. For the best start with a brand-new coil, add a few drops of e-liquid directly to the exposed cotton ports before installation.”}},{“@type”:”Question”,”name”:”How do I know if my e-liquid is too thick?”,”acceptedAnswer”:{“@type”:”Answer”,”text”:”If your e-liquid is too thick for your coil, you might notice weak hits or slow wicking. It just can’t move through the wick fast enough. And that often leads to a dry or burnt taste. A simple fix is to match the liquid to the coil. Use thinner 50/50 blends for higher-resistance MTL coils, and thicker high-VG liquids for sub-ohm coils with larger wicking ports.”}},{“@type”:”Question”,”name”:”Will one dry hit ruin a new pod coil?”,”acceptedAnswer”:{“@type”:”Answer”,”text”:”Yes – one dry hit can wreck a new pod coil. Once the cotton burns, that burnt taste can stick around. And when that happens, you may keep tasting scorched cotton even after you top up the pod. To help avoid that, prime the coil first. Add a few drops of e-liquid to the exposed cotton, then fill the pod and let it sit for 5 to 10 minutes. If it’s a brand-new coil, give it 10 to 15 minutes instead. If you still get a dry hit, stop vaping straight away and wait a bit. If the burnt taste doesn’t go away, replace the coil.”}}]}
Frequently Asked Questions
For removable coils, add 3–4 drops of e-liquid to the exposed cotton, then fill the pod through the side port rather than the centre tube. Wait at least 5 minutes before vaping, or 10 minutes for thicker liquid, mesh coils, or fixed-coil pods.
Wet the wick, fill the pod carefully, and allow the e-liquid to soak before taking the first puff. Start with short 1–2-second puffs and pause between them to help avoid dry hits and early coil failure.
Wait at least 5 minutes after filling a pod before vaping. Thicker e-liquid, mesh coils, and fixed-coil pods may need 10 minutes or longer for proper e-liquid wicking.
Many pods work best with 50/50 PG/VG e-liquid, while smaller wick ports may require liquid with 60% VG or less. Using the wrong liquid can contribute to weak flavour, dry cotton, leaking, or other coil problems.
If the device has adjustable power, begin at the lowest printed wattage for the coil. Increase by only 1–2 W if the flavour remains clean, and stay within the coil’s printed power range.
Fill through the side port and avoid the centre tube, leaving a small air gap if there is no maximum fill line. Keep the pod topped up and avoid chain vaping while the new coil is settling.
A coil usually lasts longer when the wick is properly soaked, the pod remains topped up, and the first puffs are short with pauses between them. Burnt taste, gurgling, spitback, leaking, or weak flavour can indicate dry cotton, flooding, unsuitable liquid, or a worn coil.
VapeShop.Support is available on WhatsApp at +973 66324432, with payment options including Cash on Delivery, BenefitPay, and credit or debit card.