
How to Prime Pod Coils and Avoid Mistakes


A new pod coil can burn on the first puff if I rush it. In most cases, I can avoid that by doing three things: wet the wick the right way, wait 5–10 minutes after filling, and start with short puffs at low power. Even with low-watt pod devices, a small dry spot can ruin the coil at once.
Here’s the full idea in simple terms:
- Check the coil fit first: make sure the coil sits flush and the O-rings are not cracked or twisted.
- Prime only if cotton is visible: if I can see exposed cotton, I add 1–3 drops to each cotton port. If it’s a sealed pod, I don’t drip into the coil.
- Fill the pod the right way: use the side or top fill port, not the centre airflow tube.
- Don’t overfill: fill to the line, or about 80–90% if there’s no mark.
- Wait before vaping: usually 5–10 minutes; for thicker liquid or smaller wick holes, 10–15 minutes.
- Ease into the first puffs: take 3–5 short puffs with 10–20 seconds between them.
- Start at the low end of the coil’s wattage range: then move up by 1–2 W if needed.
- Avoid chain-vaping early on: small pod coils need time to pull liquid back into the cotton.
- Use the right e-liquid: most salt nic pods work better with 50/50 liquid than high-VG juice.
- Watch the heat in Bahrain: if the device has been sitting in a hot car or direct sun, let it cool before use. Heat can thin the liquid and lead to flooding or leaking.
In short: if I give a new coil a few extra minutes at the start, I can often get more days out of it and avoid burnt hits, gurgling, and leaks.
Below, I’ll walk through the process in a clean, step-by-step way.
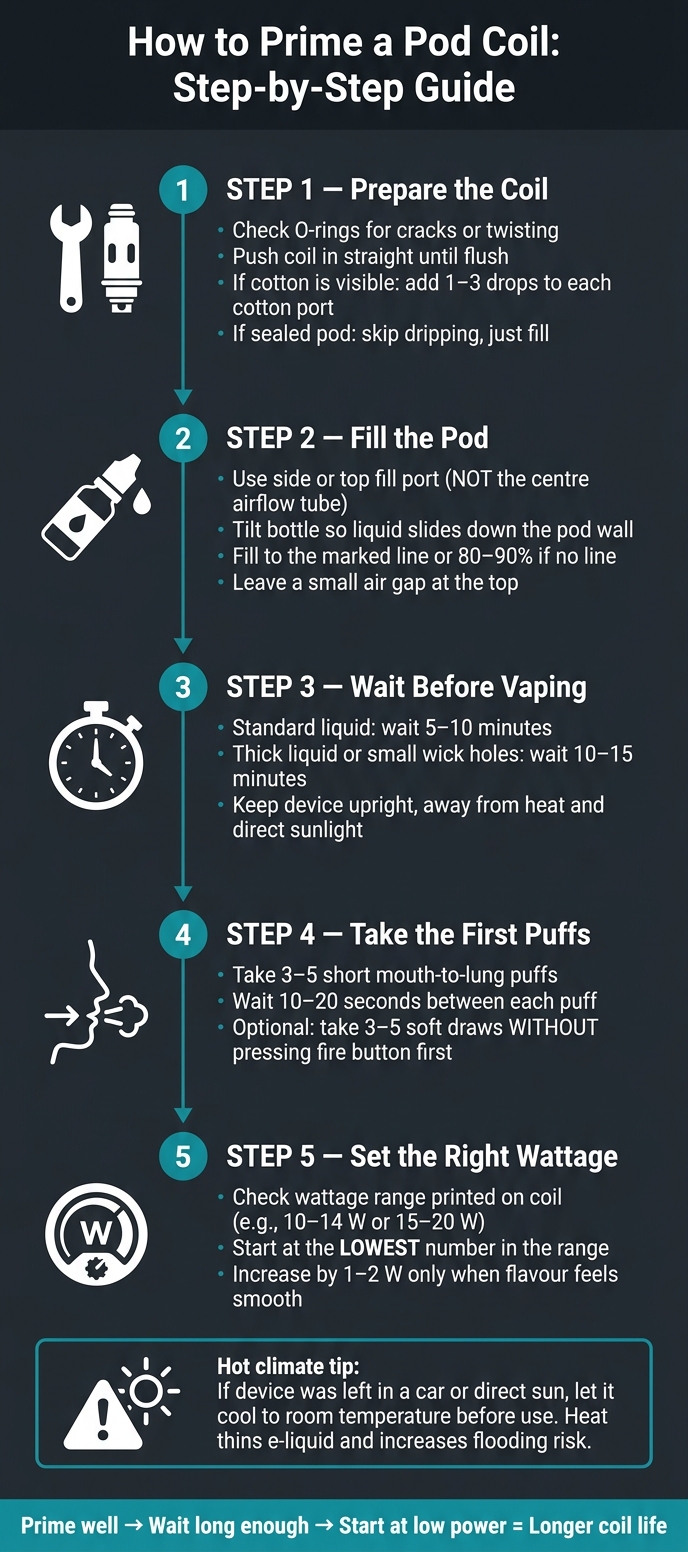
How to Prime a Pod Coil: Step-by-Step Guide
How to prime a vape coil (atomizer) in 2 minutes
sbb-itb-837e7ad
Step 1: Prepare the New Pod Coil
Before you add even one drop of e-liquid, make sure the coil is fitted and checked properly. If this part gets rushed, that’s usually when trouble starts.
Install the Coil and Check the Seals
Turn off the device, fit the coil firmly, and check the seals before filling. Remove the pod, then pull the old coil straight out. That helps you avoid tearing the O-rings or bending the seat.
Before you press in the new coil, give it a quick look. Check the O-rings for cracks, flat spots, or twisting. A damaged O-ring is one of the most common reasons pods leak. Then inspect the fill port plug on the pod. If the silicone feels stiff, looks torn, or has lost its shape, it may not close properly after filling.
Push the new coil in straight until it sits flush with the base of the pod. The flat edge needs to line up with the matching slot in the pod. Even a small misalignment can stop the pod from connecting as it should or lead to leaks. Put the pod back in and make sure the fit feels firm and even before you fill it.
Bahrain’s heat can soften seals, so it’s best to install coils away from direct sun and hot cars. Once the coil is seated the right way, move straight to filling the pod.
Prime Only Exposed Cotton Coils
Whether you should drip e-liquid onto the coil before filling depends on the type of pod you use:
- Exposed cotton coils: add 1–3 drops to each cotton port until it looks damp.
- Sealed pods: don’t drip into the coil; fill the pod and wait.
If you’re using replaceable coils and you can see white cotton through the small holes in the metal casing, add a few drops of e-liquid straight onto those ports. You’re aiming for damp cotton, not a soaked mess. Don’t pour liquid down the central chimney. That skips the wick and often causes gurgling and spitback on the first puff.
With sealed salt nic pods, don’t drip into the coil at all. Just fill the pod and let it wick on its own. After that, let the wick soak before the first puff.
Step 2: Fill the Pod and Wait Before Vaping
Fill the Pod Without Blocking the Airflow
Once the coil is in place, fill the pod with a bit of care before the first wait. Take the pod out, then open the side or top fill port – not the centre airflow tube. If e-liquid gets into the airflow path, you can end up with flooding, gurgling, spitback, and leaks.
Tilt the bottle tip so the liquid slides down the pod wall instead of going straight into the coil. Fill it slowly to the marked line, or to about 80–90% if there’s no line, and leave a small air gap. Then close the port, wipe away any extra liquid, and put the pod back in.
Wait 5 to 10 Minutes After Filling
The cotton needs a little time to soak up the liquid properly. Wait 5 to 10 minutes before vaping. If you’re using thicker e-liquids or a pod with small wicking ports, give it 10 to 15 minutes instead.
Set the device upright indoors, away from heat and direct sunlight. Once that’s done, you can move on to the first low-power puffs.
Step 3: Take the First Puffs at the Right Power
Once the wick has soaked, ease the coil in gently so the cotton can settle without scorching.
Start With Light First Puffs
Take 3 to 5 short mouth-to-lung puffs, with a 10 to 20 second pause between each one. That short wait gives the wick time to resaturate and helps the coil bed in without putting too much strain on the cotton.
If you’re using a manual-fire device, do 3 to 5 soft draws without pressing the fire button first. This pulls e-liquid into the coil through airflow alone. It’s especially helpful with tighter salt nic pods. Just don’t pull too hard, or you may flood the coil.
After those first light draws, check for the best vape coils and their lowest safe wattage before you vape as normal.
Check Wattage Against the Coil Rating
Most replaceable coils have their recommended wattage range printed on the coil body – for example, "10–14 W" or "15–20 W". Start at the lowest number in that range for the first few puffs. Then move up in small steps of 1 to 2 W only when the flavour feels smooth and steady.
If no wattage range is printed, begin at the lowest safe setting and move up slowly.
With fixed-power devices, keep the first puffs very short and leave extra time between draws.
Account for Bahrain‘s Heat
In Bahrain, hot weather can change how a fresh pod behaves, so the first few puffs need a bit more care.
Heat can thin e-liquid and make a fresh pod wick faster. That sounds helpful, but it can also make flooding more likely if the device is already warm. If the device has been left in a car or under direct sunlight, let it cool to room temperature first. Wipe off any condensation or leaks from the pod and contacts, then take 2 to 3 gentle draws without firing the device before you start.
If you hear gurgling or notice a watery flavour, that’s a sign the coil is flooding.
Common Mistakes That Shorten Coil Life
Even a well-primed pod coil can burn out early if you push it too hard or fill it with the wrong e-liquid.
After priming the coil and taking the first few puffs the right way, coil life usually comes down to everyday habits. And small mistakes add up fast.
Skipping Priming, Rushing the First Use, and Chain-Vaping
If you skip priming or start vaping too soon after filling the pod, the wick may not be fully soaked. That dries it out and burns the cotton much faster. A freshly filled pod needs a bit of time before the first puff. If you fire it straight away, the coil can be damaged almost at once.
Chain-vaping causes the same kind of problem. The wick needs time to pull more liquid back in between draws. If you keep taking puff after puff, it can’t keep up, and the cotton starts to dry out.
Power and e-liquid choice matter just as much as your puffing pace.
Using the Wrong Power or E-Liquid
Running a pod vape kit above the coil’s rated wattage creates too much heat. That overheats the wick and burns the cotton faster. It’s best to stay within the wattage range printed on the coil and begin at the low end.
E-liquid also plays a big part. High-VG liquid is often too thick for most salt nic pods, so it moves through the wick too slowly. Pod-friendly 50/50 or higher-PG liquid usually works better. Very sweet liquids can also leave residue on the coil, which cuts coil life short. And if the pod gets too low, refill it before the wick starts running dry.
Conclusion: A Simple Routine for Longer Coil Life
Longer coil life usually comes down to three simple habits: prime the coil well, wait long enough, and start at low power.
Begin with a few short puffs at the lower end of the coil’s wattage range. That gives the wick time to settle in without getting scorched straight away. If the flavour still seems dry, stop there and give it more time.
With salt nicotine pod devices, this careful approach matters even more. They tend to perform best at lower power, and too much heat can make the vape feel harsh while also wearing the coil out faster. In Bahrain’s heat, keep your pod away from direct sun and never leave it in a parked car if you want steadier performance.
FAQs
How do I know if my pod coil is fully primed?
Your pod coil is fully primed when the cotton in the wicking ports looks dark and translucent, not white and fluffy.
Before installing the coil, add 5 to 7 drops of e-liquid to the exposed cotton. Once you fill the pod, wait 5 to 15 minutes. Then take a few gentle, non-fired draws to help pull liquid into the coil.
What should I do if a new pod coil tastes burnt straight away?
Stop vaping right away. If you get a burnt taste from the start, the cotton wick is usually scorched. Once that happens, the damage is permanent.
If the burnt taste is still there after you refill the pod and let it sit for 10 to 15 minutes, replace the coil.
Next time, prime the coil first. Add 3 to 5 drops of e-liquid to the wick, then wait 5 to 15 minutes before taking your first puff.
Why does my pod gurgle or leak after filling?
Gurgling and leaking usually mean the coil chamber has flooded with too much e-liquid. This often happens when the pod is overfilled, which pushes liquid into the airflow channels. Hot weather can thin the e-liquid too, so leaks become more likely.
A thin e-liquid can cause the same issue if it doesn’t suit your coil. To sort it out, remove the pod and gently blow through the mouthpiece over a paper towel to clear the extra liquid.
Related Blog Posts
- How to Replace Coils in Pod Systems
- Beginner’s Guide to Pod Systems
- Pods vs. Coils: Compatibility Explained
- How to Store Coils to Avoid Burnt Taste
{“@context”:”https://schema.org”,”@type”:”FAQPage”,”mainEntity”:[{“@type”:”Question”,”name”:”How do I know if my pod coil is fully primed?”,”acceptedAnswer”:{“@type”:”Answer”,”text”:”Your pod coil is fully primed when the cotton in the wicking ports looks dark and translucent, not white and fluffy. Before installing the coil, add 5 to 7 drops of e-liquid to the exposed cotton. Once you fill the pod, wait 5 to 15 minutes. Then take a few gentle, non-fired draws to help pull liquid into the coil.”}},{“@type”:”Question”,”name”:”What should I do if a new pod coil tastes burnt straight away?”,”acceptedAnswer”:{“@type”:”Answer”,”text”:”Stop vaping right away. If you get a burnt taste from the start, the cotton wick is usually scorched. Once that happens, the damage is permanent. If the burnt taste is still there after you refill the pod and let it sit for 10 to 15 minutes, replace the coil. Next time, prime the coil first. Add 3 to 5 drops of e-liquid to the wick, then wait 5 to 15 minutes before taking your first puff.”}},{“@type”:”Question”,”name”:”Why does my pod gurgle or leak after filling?”,”acceptedAnswer”:{“@type”:”Answer”,”text”:”Gurgling and leaking usually mean the coil chamber has flooded with too much e-liquid. This often happens when the pod is overfilled, which pushes liquid into the airflow channels. Hot weather can thin the e-liquid too, so leaks become more likely. A thin e-liquid can cause the same issue if it doesn’t suit your coil. To sort it out, remove the pod and gently blow through the mouthpiece over a paper towel to clear the extra liquid.”}}]}
Frequently Asked Questions
To avoid burning a new pod coil on the first puff, make sure the coil sits flush in the pod and that the O-rings are not cracked or twisted. If you can see exposed cotton on the coil, add 1–3 drops of e-liquid to each cotton port, then fill the pod through the side or top fill port (not the centre airflow tube), wait 5–10 minutes, and start with 3–5 short puffs at the low end of the wattage range.
If the pod is sealed and the cotton is not directly visible, do not drip e-liquid into the coil from outside. Instead, fill the pod through its designated side or top fill port to about 80–90% of its capacity, wait around 5–10 minutes for the cotton inside to soak fully, then take a few short puffs with pauses between them at low power before increasing the wattage slowly.
Even with low-watt pod systems, a small dry spot in the cotton can burn the coil instantly if it is not fully saturated. To reduce the risk, prime the cotton if visible, fill through the correct port without overfilling, wait 5–10 minutes, then ease into vaping with 3–5 short puffs and 10–20 seconds between them before gradually moving up by 1–2W only if needed.
Most salt nic pods work more smoothly with 50/50 e-liquid, as this thickness wicks easily through small cotton ports and helps avoid dry spots that can burn the coil. Very thick high-VG juice can struggle in compact pod coils, so using a suitable 50/50 blend and allowing 10–15 minutes for thicker liquid or very small wick holes can improve flavor and coil lifespan.
High temperatures can thin e-liquid inside a pod, which may lead to flooding or leaking and affect how consistently the cotton stays saturated. If your device has been left in a hot car or direct sun, let it cool down before vaping, then check the coil fit, make sure you have not overfilled the pod, and take a few gentle puffs to confirm smooth wicking.
Good coil maintenance starts with installing the coil correctly so it sits flush and the O-rings seal properly, then using the right fill port and avoiding overfilling to keep airflow clear. Each time you change a coil, allow 5–10 minutes for the cotton to saturate, avoid chain-vaping early on so the wick can pull liquid back in, and always begin at the low end of the recommended wattage range before making small increases.