
How to Prime Vape Coil and Stop Dry Hits


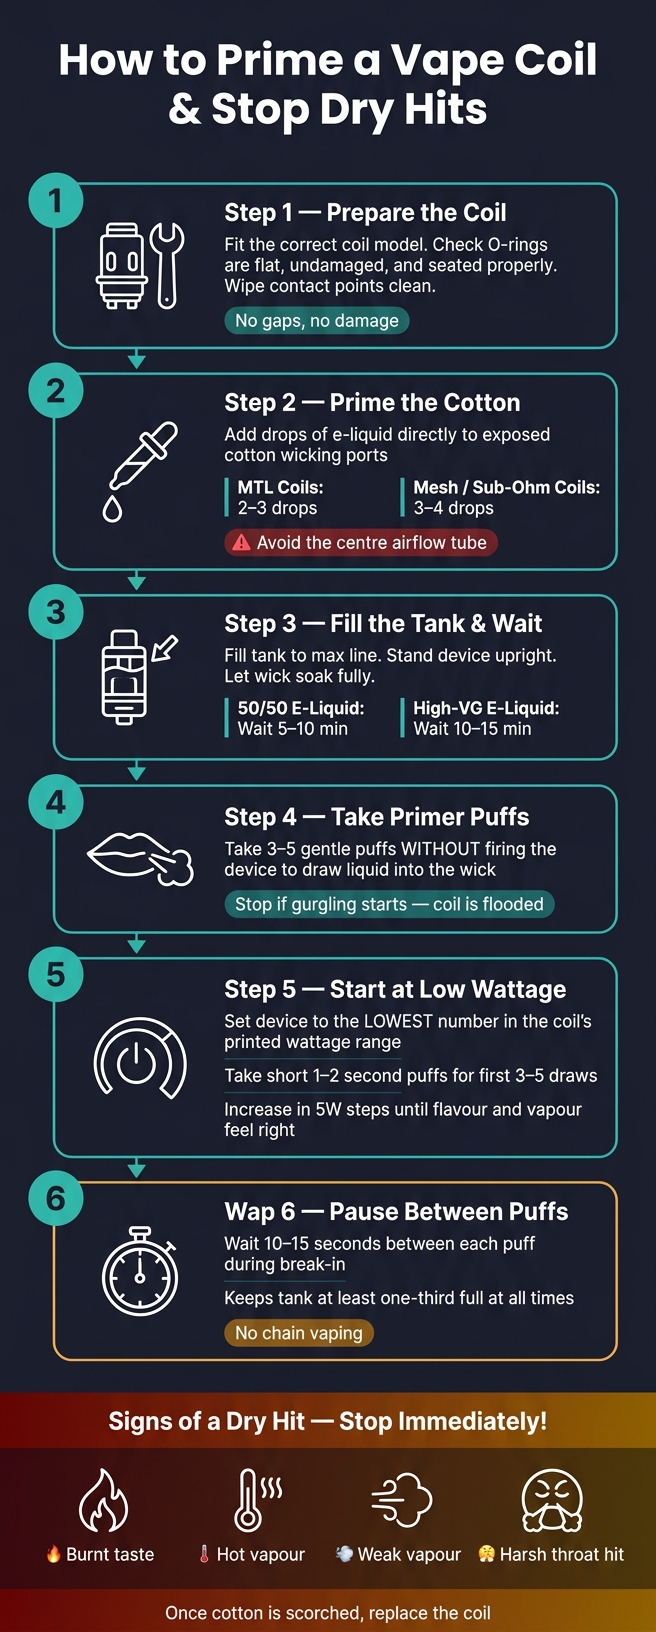
A new coil can burn on the first puff if the cotton is still dry. I can cut that risk by adding a few drops of e-liquid to the coil, filling the tank, waiting 5–15 minutes, and starting at the lowest wattage on the coil.
Here’s the short version:
- I check that the coil is the right model for the pod or tank as part of learning how to use a vape effectively.
- I add 2–3 drops on small MTL coils, or 3–4 drops on mesh and sub-ohm coils.
- I keep e-liquid out of the centre airflow tube.
- I wait 5–10 minutes for 50/50 liquid, or 10–15 minutes for high-VG liquid.
- I take 3–5 gentle primer puffs without firing.
- I start with short 1–2 second puffs at low power.
- I leave 10–15 seconds between puffs so the wick can soak again.
If I skip those steps, I’m more likely to get a burnt taste, hot vapour, weak vapour, or a harsh throat hit. And once cotton is scorched, the coil usually needs replacing.
A few points matter more in Bahrain too. Heat can thin e-liquid and affect how the coil feeds, so I keep my device indoors and out of direct sun. I also keep the pod or tank at least one-third full so the wicking ports stay covered.
| Step | What I do | Target |
|---|---|---|
| 1 | Fit the correct coil and check O-rings | No gaps, no damage |
| 2 | Prime exposed cotton | Damp, not flooded |
| 3 | Fill and wait | 5–15 min |
| 4 | Start low | Bottom of wattage range |
| 5 | Puff gently | 1–2 sec draws |
| 6 | Pause between puffs | 10–15 sec |
The whole job takes only a few minutes, but it can help the coil last longer and stop dry hits from day one.
How to Prime a Vape Coil: Step-by-Step Guide to Prevent Dry Hits
How to prime a vape coil (atomizer) in 2 minutes
sbb-itb-837e7ad
Step 1: Prepare the New Coil Before Adding E-Liquid
Before you add any e-liquid, switch the device off and take the tank or pod apart. Remove the old coil, then wipe the coil base, threads, and contact points with a dry tissue or cotton bud. This clears leftover residue so the new coil can sit properly.
Check the new coil before you fit it. The cotton should look white or off-white, evenly packed, and undamaged. Make sure the centre opening is clear. Also check that you are choosing the best vape coils made for your specific tank or pod. A coil can look almost the same and still leak or run too hot if it is not the right match. Take a quick look at each O-ring too. It should sit flat in its groove, with no cracks, nicks, or twists.
Fit the coil straight into the base or pod slot without forcing it. Tighten it by hand only until it feels snug. If it does not sit flush, the issue is often the wrong coil or an O-ring that has shifted out of place. Keep the chamber dry until the coil is fully seated. Once the coil is in place and the tank is dry, you can move on to priming the cotton. For more safety tips, see our beginner’s guide to vaping.
Read the markings on the coil before doing anything else. Most coils show the resistance (Ω) and a wattage range on the outside. Using power outside that range can scorch a new coil fast.
Match Coil Type to E-Liquid Thickness
Use the coil’s resistance as a guide when choosing your e-liquid and nicotine strength before priming. Here’s a quick reference for common coil ranges and their usual wattage bands:
| Coil Resistance | Vaping Style | Recommended E-Liquid | Typical Wattage |
|---|---|---|---|
| 1.0 Ω – 1.8 Ω | Mouth-to-Lung (MTL) | 50/50 VG/PG or nicotine salts | 8–15 W |
| 0.8 Ω mesh | Restricted Direct Lung (RDL) | 70/30 VG/PG freebase | 12–18 W |
| 0.4 Ω – 0.6 Ω | Direct Lung (DTL) | 70/30 VG/PG | 20–35 W |
| 0.15 Ω – 0.3 Ω | Sub-Ohm DTL | High-VG freebase | 40–80 W |
Mesh and sub-ohm coils usually hold more cotton and have a larger heating surface, so they need a longer soak before the first puff. Higher-resistance MTL coils tend to work better with thinner 50/50 blends or nicotine salts, since those liquids wick faster through smaller intake ports.
Step 2: Prime the Coil, Fill the Tank or Pod, and Wait
After you fit the coil, prime the wick before you fill the tank or pod. Add 2–3 drops of e-liquid to each cotton opening on MTL coils, or 3–4 drops on mesh or sub-ohm coils. If you can see cotton at the top, add 1–2 drops there too. Then reassemble the tank or pod, fill it through the fill port, and leave it standing upright so the wick can soak properly.
Be careful not to get e-liquid into the centre airflow tube. That often leads to flooding, gurgling, spitback, and weak vapour.
Once the cotton looks damp, not dripping, you’re in the right spot. Fill to the max line, but leave a small air gap at the top. That little gap helps the tank work as it should.
How Many Drops to Add Without Flooding the Coil
Go slowly with the drops. Add one, wait a few seconds, then add the next. If liquid starts pooling at the base of the coil or leaking from the airflow holes before the tank is assembled, you’ve gone too far.
Too much priming pushes extra liquid into the airflow path, which causes gurgling, spitback, and weak vapour. Too little leaves dry patches behind, and those can scorch on the first fire. A good rule of thumb: stop when the cotton looks evenly damp across the surface.
Stand the Device Upright and Take Primer Puffs
Keep the device upright while it soaks. After filling, leave it standing so the wick can finish absorbing the liquid.
| Coil Type | E-Liquid | Wait Time |
|---|---|---|
| Standard MTL coil | 50/50 or nicotine salts | 5–10 minutes |
| Mesh or sub-ohm coil | High-VG freebase | 10–15 minutes |
After that, take 3–5 gentle primer puffs without firing. This helps draw e-liquid into the wick. If the device starts gurgling, stop there – the coil is flooded.
Step 3: Take the First Puffs at Low Power
Once the coil is soaked, start at the lowest safe wattage. Check the coil’s printed wattage range – stamped on the coil itself or listed in the manual – then set your device to the lowest number in that range.
Take light, short puffs for the first few draws, about 1–2 seconds each. Aim for 3–5 draws, then check the flavour and vapour. If both seem fine, increase the power by 5 W and try again. Keep moving up in 5 W steps until the flavour and vapour feel right.
If you’re using a pod device without manual wattage control, wait the full 10–15 minutes after filling before you start. Then take very light, short puffs at first. On auto-draw pods, a gentle inhale helps keep the fire time shorter. This is especially important for high-performance devices like the SEKURUS Dare Kit. If your pod has airflow control, start with it slightly more closed for the first few puffs.
Avoid Chain Vaping During the First Few Minutes
Leave 10–15 seconds between puffs during break-in. That short pause gives the e-liquid time to flow back into the cotton before the next hit. If you chain vape too soon, the middle of the wick can dry out faster than the liquid can replace it. That’s one of the main ways a new coil gets wrecked on day one.
If the first puffs feel off, stop before the coil takes a hit. Early warning signs include:
- Slight harshness or scratchiness
- Muted or flat flavour after a few draws
- Vapour feels hotter than normal at that wattage
- A faint burnt or toasty note in the taste
If you notice any of these, stop straight away. Lower the wattage, make sure the tank is at least half full, and leave the device upright for a few minutes so the wick can soak again. If the burnt taste doesn’t go away, replace the coil.
Common Mistakes That Cause Burnt Taste and How to Fix Them
Most burnt hits come down to a handful of mistakes that are easy to avoid. If a new coil still tastes burnt, one of the issues below is usually the reason.
| Mistake | What It Causes | How to Prevent It |
|---|---|---|
| Skipping cotton priming | Dry cotton burns on the first hit; the burnt taste can linger | Prime all exposed cotton before first use. |
| Firing immediately after filling | The wick has not fully saturated, so the first few hits can scorch it | Do not fire until the wick is fully soaked. |
| Exceeding the coil’s wattage range | The coil overheats faster than the wick can resupply liquid | Start at the bottom of the printed range. |
| Long, hard puffs | Liquid is pulled away faster than the wick can refill | Use short, gentle puffs and pause between draws. |
| Using very thick e-liquid without enough soak time | High-VG liquid wicks slowly and can leave dry spots | Match liquid thickness to your vape device type; give high-VG extra soak time. |
| E-liquid level too low | The wicking ports are exposed to air and the cotton dries out | Keep the tank or pod at least one-third full. |
One more thing matters in Bahrain: heat. Hot weather can make wicking less steady, especially if a device or bottle sits in a car or near a window. Keep devices and e-liquids indoors, away from heat and direct sunlight.
If the burnt taste stays even after fixing these issues, the coil is done. Once the cotton is scorched, there’s no easy way back. Rinsing the coil or switching e-liquid won’t solve it. You’ll need to replace the coil.
When to Replace the Coil and Where to Get Supplies in Bahrain
Replace the coil when the burnt taste shows up on every puff, flavour turns noticeably muted, vapour output drops, or the liquid in the tank looks darker than usual. Those are clear signs the cotton has gone too far and the coil needs to be changed.
VapeShop.bh stocks replacement coils, pods, e-liquids, salt nicotine devices, and accessories in Bahrain. Orders can be placed via WhatsApp.
Conclusion: The Simple Routine That Keeps Every New Coil Working
Each time you install a new coil, stick to the same routine: prime the cotton directly, fill the tank or pod the right way, wait long enough for the liquid to soak in fully, and begin at low power with short, gentle puffs. Don’t rush the first few draws, and give the wick a moment to soak up more liquid between puffs.
It only takes a few extra minutes, but the payoff is obvious: fewer dry hits, cleaner flavour from the first puff, and a coil that lasts longer. When you do it the same way every time, coil care becomes much simpler.
FAQs
Can I over-prime a new coil?
Yes. Over-priming usually means too much e-liquid ends up where it shouldn’t, which can lead to flooding or leaks instead of helping the coil.
Use only a few drops to soak the cotton. Then install the coil and let it sit for 5–10 minutes before you vape. Once the wick no longer looks white or dry, it’s primed.
Why does a new coil still taste burnt after waiting?
A new coil usually tastes burnt when the cotton wick gets scorched on the first use. That often happens if the coil is fired before the wick is fully soaked with e-liquid. Once the cotton is burnt, the damage is permanent, and the coil needs to be replaced.
It can also happen from chain vaping, because the wick doesn’t get enough time to soak up more e-liquid between puffs. Another common cause is e-liquid that’s too thick for the coil, so it can’t feed the wick fast enough.
If it still tastes burnt, check that you primed the coil properly and let it sit for 10–15 minutes before using it.
Does hot weather in Bahrain affect coil priming?
Yes. Bahrain’s heat can thin e-liquid. When that happens, leaks are more likely, and flavour and nicotine quality can take a hit.
To help protect your coil, keep your device out of hot cars and direct sunlight. Store e-liquid in a cool, stable spot. And after priming, stick to the usual 5–10 minute wait so the cotton is fully soaked before the first puff.
Related Blog Posts
- How to Replace Coils in Pod Systems
- How to Build Coils for Competitive Cloud Chasing
- How to Store Coils to Avoid Burnt Taste
- How to Prime Pod Coils and Avoid Mistakes
{“@context”:”https://schema.org”,”@type”:”FAQPage”,”mainEntity”:[{“@type”:”Question”,”name”:”Can I over-prime a new coil?”,”acceptedAnswer”:{“@type”:”Answer”,”text”:”Yes. Over-priming usually means too much e-liquid ends up where it shouldn’t, which can lead to flooding or leaks instead of helping the coil. Use only a few drops to soak the cotton. Then install the coil and let it sit for 5–10 minutes before you vape. Once the wick no longer looks white or dry, it’s primed.”}},{“@type”:”Question”,”name”:”Why does a new coil still taste burnt after waiting?”,”acceptedAnswer”:{“@type”:”Answer”,”text”:”A new coil usually tastes burnt when the cotton wick gets scorched on the first use. That often happens if the coil is fired before the wick is fully soaked with e-liquid. Once the cotton is burnt, the damage is permanent, and the coil needs to be replaced. It can also happen from chain vaping, because the wick doesn’t get enough time to soak up more e-liquid between puffs. Another common cause is e-liquid that’s too thick for the coil, so it can’t feed the wick fast enough. If it still tastes burnt, check that you primed the coil properly and let it sit for 10–15 minutes before using it.”}},{“@type”:”Question”,”name”:”Does hot weather in Bahrain affect coil priming?”,”acceptedAnswer”:{“@type”:”Answer”,”text”:”Yes. Bahrain’s heat can thin e-liquid. When that happens, leaks are more likely, and flavour and nicotine quality can take a hit. To help protect your coil, keep your device out of hot cars and direct sunlight. Store e-liquid in a cool, stable spot. And after priming, stick to the usual 5–10 minute wait so the cotton is fully soaked before the first puff.”}}]}
Frequently Asked Questions
To prime a vape coil, fit the correct coil, check that the O-rings have no gaps or damage, then add a few drops of e-liquid directly to the exposed cotton so it is damp but not flooded. Fill the tank or pod and wait 5–10 minutes for 50/50 e-liquid, or 10–15 minutes for high-VG, then take 3–5 gentle primer puffs without firing before using normal power. Start at the bottom of the recommended wattage range, take short 1–2 second puffs, and leave 10–15 seconds between puffs so the wick can soak again. These steps help prevent dry hits and extend coil life.
Dry hits and burnt taste usually happen when the cotton inside the coil has not had enough time to soak with e-liquid before vaping. Skipping priming steps or vaping immediately after filling can leave parts of the wick dry, causing hot vapour, a harsh throat hit, or scorched cotton that often ruins the coil. Keeping the pod or tank at least one-third full ensures the wicking ports stay covered and helps avoid dry spots. Once the cotton is burnt, the coil normally needs to be replaced.
For coil priming, small MTL coils typically need about 2–3 drops of e-liquid on the exposed cotton, while mesh and sub-ohm coils benefit from around 3–4 drops. The aim is to make the cotton damp without flooding the coil and to keep e-liquid out of the centre airflow tube. After adding these drops, the tank should be filled and left to sit for 5–15 minutes depending on the VG level. Gentle primer puffs without firing help distribute the e-liquid evenly through the wick.
Primer puffs are gentle draws on the mouthpiece without pressing the fire button after filling a tank with e-liquid. Taking 3–5 of these light puffs helps pull e-liquid through the wicking ports into the cotton, improving saturation before any heat is applied. When combined with a short waiting time and starting at low wattage, primer puffs reduce the risk of burnt taste, harsh throat hit, and weak vapour. This simple step is part of good coil maintenance and wick priming.
After installing and priming the coil, 50/50 e-liquids generally need about 5–10 minutes in a filled tank to fully soak into the wick. High-VG liquids are thicker, so waiting 10–15 minutes is recommended to ensure the cotton is saturated and ready. During this time, keeping the tank at least one-third full helps cover the wicking ports properly. A short wait plus a few primer puffs is usually enough to prevent dry hits on a fresh coil.
In hot weather, heat can thin e-liquid and change how it feeds the coil, so keeping the device indoors and out of direct sun helps maintain stable wicking. Regular coil maintenance includes checking O-rings for damage, ensuring the correct coil model is fitted, and keeping the pod or tank at least one-third full so the wicking ports stay covered. Following proper wick priming, using short 1–2 second puffs, and pausing 10–15 seconds between draws also reduces stress on the cotton. These habits make dry hits less likely and can help the coil last longer.
Wick priming means wetting the exposed cotton with a few drops of e-liquid and allowing extra time for the liquid to soak through before applying power. Proper wick priming helps the coil reach full saturation, which prevents hot spots and reduces the chance of burnt taste or harsh throat hits on the first puffs. Starting at the lowest wattage printed on the coil and using short, gentle draws puts less stress on the cotton while it breaks in. Once scorched, the wick rarely recovers, so priming is key to keeping the coil usable.