

How to Update Vape Mod Firmware


If your vape mod supports firmware updates, I only use the maker’s own software, match the file to the exact model, charge the device to at least 50%, and never unplug it during the install. That is the short answer.
A bad update can leave a mod stuck on the logo screen, wipe saved profiles, or stop safety functions from working as expected. On the other hand, a proper update can fix menu bugs, screen lag, odd battery readings, and TC issues.
Before I start, I keep this checklist in mind:
- Check the exact model and revision
- Confirm the current firmware version
- Charge the mod to 50% or more
- Remove the tank or atomiser
- Back up wattage, TC, TCR, and profile settings
- Download files only from the maker’s support page
- Use a Windows PC and a data USB cable
- Wait for the success message before disconnecting
- Test the mod first without a tank attached
A few points matter more than most:
- Many box mods can be updated, but most vape device types like pods and disposables cannot
- Most updates reset settings to factory defaults, so I expect to re-enter them
- If the updater does not detect the mod, the cause is often a charge-only cable or the wrong update mode
- If the flash fails, the maker may ask for the update date in DD-MM-YYYY format, such as 21-08-2026
In simple terms, the job has four parts: prepare the device, get the right files, run the update on a computer, and test the mod after the restart.
That is the full process in a nutshell, without the extra detail.
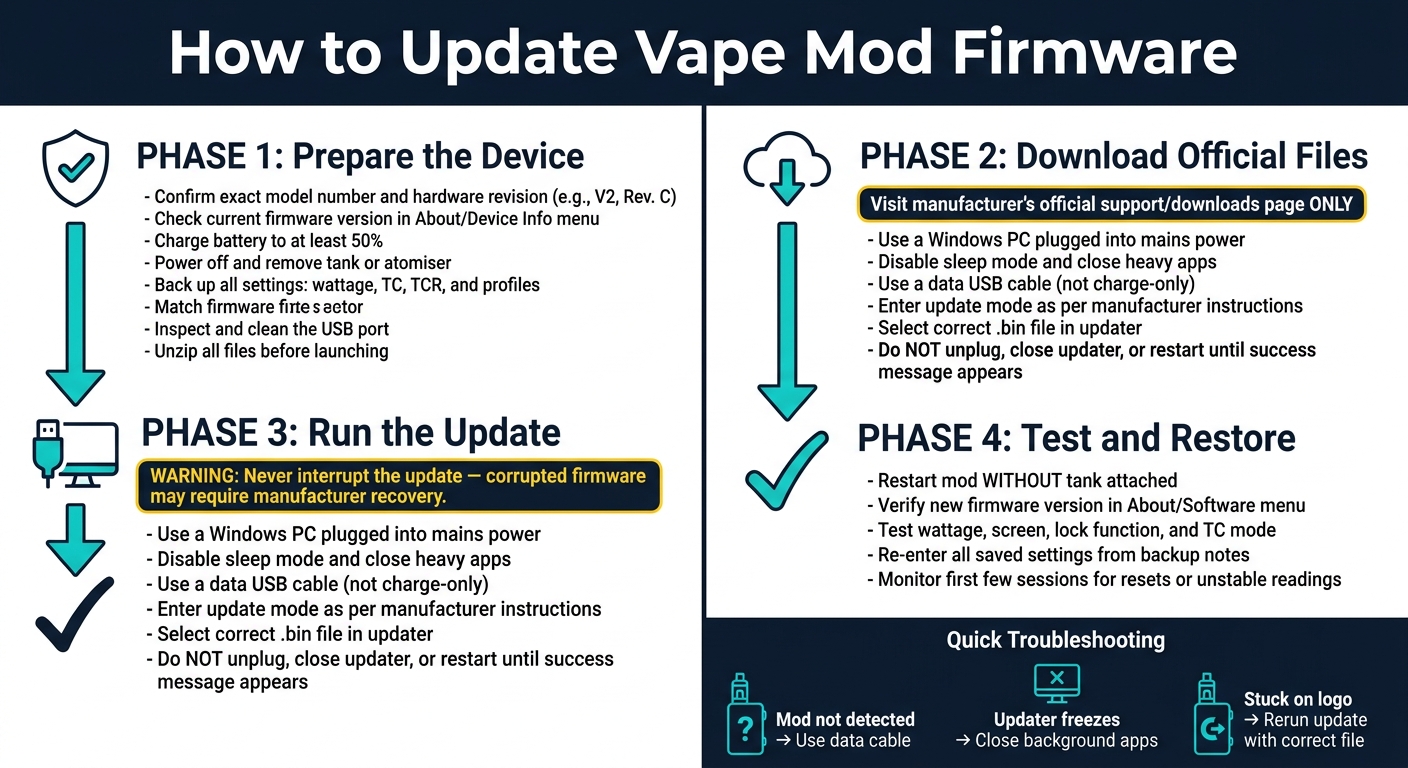
How to Update Vape Mod Firmware: Step-by-Step Guide
Check compatibility and prepare the mod
If your mod supports updates, start by matching the exact model, getting the battery ready, and saving your settings before you download anything.
Confirm the model number and current firmware version
Find the full model name on the mod body, the underside of the device, the original box, or the user manual. Also check for revision marks like V2 or Rev. C on the mod, battery door, or packaging. That small detail matters. Firmware needs to match the exact model and revision.
After that, check the current firmware version in the device settings menu. On most mods, it sits under About, Device Info, or Software Version. Using firmware made for a similar-looking device with a different revision can lead to boot loops, frozen screens, or safety features like overheat shutdown and short-circuit cut-off not triggering as they should.
Charge the device and remove the tank or atomiser
Charge the mod to at least 50% before updating. If the device loses power during the update, the firmware can get corrupted and the mod may need service.
When the battery is ready, power off the mod and remove the tank, pod, or atomiser from the 510 connector. This helps prevent accidental firing and keeps the USB port safer from leaks.
Give the USB port a quick check too. Clear dust with a soft brush or a wooden toothpick. Never use metal. If you see e-liquid residue, wipe it gently with a dry cloth. If the port feels loose, looks bent, or shows burn marks, do not proceed until it has been repaired.
Back up your settings before the update
Most firmware updates reset the mod to factory defaults. That means your saved profiles, wattage settings, and temperature limits will likely be wiped. Before you update, take a photo or write down each profile, wattage, resistance, TC limit, and power curve.
Some mods also let you export a configuration file through PC software before updating. Check the manufacturer’s software to see if that option is there before you begin.
Once the mod is ready, download the official updater and the matching firmware file.
sbb-itb-837e7ad
Download the official update software and firmware file
Download the updater and firmware from the manufacturer’s official support page.
Use the manufacturer’s support page only
Go to the manufacturer’s official support page and get the updater there. In most cases, you’ll find it under Support or Downloads, along with the firmware file and update tool.
Never download firmware from forums, file-sharing sites, or reposted links on social media. Unofficial firmware can brick the mod or disable safety protections.
That point matters more than it may seem. A file with the wrong code can turn a working device into a dead one fast.
Match the firmware file to your exact device
Download only the file listed for your exact model and board revision. Even devices in the same series may use different boards or chipsets, so the match needs to be exact.
Before you download anything, read the release notes. Check that the firmware version names your device and includes any hardware revision listed for it. If the file doesn’t match your device, stop and contact support.
Download both the firmware file and the updater utility. Unzip the files before launching the updater.
After downloading both files, connect the mod to the computer and start the updater.
Run the firmware update on a computer
Once you’ve downloaded the right file, move to the computer update step.
Use a Windows PC, since most official vape mod updaters are built for Windows. Before you begin, plug your laptop into mains power, turn off sleep mode, and close any heavy apps. You don’t want the computer slowing down or switching off halfway through.
Connect the mod and enter update mode
Put the mod into update mode exactly as the maker says for your exact model, including top Arab vape brands available locally. Some mods need to be switched off first. Others need you to hold a button combination while plugging in the USB cable. That step matters because the computer needs to see the mod as a firmware device, not just something that’s charging.
Use the original USB cable that came with the mod, or another cable you know can handle data. A charge-only cable won’t pass data, and that can stop the updater from seeing the device at all. If the mod doesn’t show up, try another USB port on the computer before assuming something has gone wrong.
Open the updater and start the install
When the mod appears in the updater’s device list, you’re set to continue. If the updater asks for a file, choose the correct .bin file for your exact model.
Start the install, then keep an eye on the progress bar, percentage, or finish message. Wait until the updater clearly says the process was successful before disconnecting anything.
Do not interrupt the update while it runs
While the update is running, leave everything alone. Don’t unplug the cable, remove the batteries, close the updater, or restart the computer until it’s done. It’s normal for the mod’s screen to go blank during the flash.
If the update gets interrupted, the firmware can become corrupted. If that happens, the mod may stop starting as normal. You may then need the maker’s recovery steps or support to sort it out.
Once the updater confirms success, check the new version and test the mod.
Test the device and restore your settings
Check the new firmware version and device behaviour
After the flash, unplug the mod and restart it without the tank or atomiser attached. Open About, Software, or Firmware, and make sure the version matches the one listed on the manufacturer’s update page.
Next, run through the basics. Check wattage adjustment, screen response, and the lock function. If the mod supports temperature control, make sure the mode shows the correct unit. If features are missing, the screen feels slow, or the version number doesn’t match, that usually points to a failed or wrong update.
Restore saved settings and monitor performance
Now put your saved settings back in using your notes. Re-enter your wattage, TC, TCR, and power profiles, along with any separate profiles you use for different setups.
For resistance-sensitive modes, refit the same coil and lock the resistance if your mod allows it. Then check that the reading is close to what you expect. For the first few sessions, stay below your usual wattage and keep an eye out for resets, unstable resistance readings, or uneven output. Those are early warning signs that the update didn’t install cleanly.
Fix common update problems
If issues are still there, use this quick fix table.
| Symptom | Possible cause | Recommended fix |
|---|---|---|
| Mod not detected by computer | Faulty or charge-only USB cable; driver not installed | Use a data cable, try another USB port, reinstall the manufacturer driver, and plug directly into the PC. |
| Updater freezes or shows an error | Background apps interfering; incorrect firmware file | Close other programmes, confirm the file matches your model, and retry with the laptop on mains power. |
| Device stuck on startup logo | Incomplete or corrupted flash | Force restart, reinsert external batteries if used, and rerun the update with the correct file. |
| Menus missing or language changed | Update reset to factory defaults | Restore language, preferences, wattage, and profiles from your notes. |
| Random restarts or settings resets | Firmware instability; battery contact issue | Clean the battery contacts, test another tank, and reinstall the firmware or return to a stable version from the manufacturer. |
If basic troubleshooting doesn’t fix the problem, contact the manufacturer and include the firmware version, the update date in DD-MM-YYYY format, and the exact symptoms.
FAQs
How do I know if my mod supports firmware updates?
Check your mod’s model or chip details in the Settings or About screen, or on the label printed on the device. Then search for the maker’s app or PC software for that exact model.
If the manufacturer offers firmware updates for it, that means your mod supports them. You can also plug it in with USB and check whether the software shows a firmware update option.
What should I do if the updater cannot detect my mod?
First, turn the device off, then switch it back on. After that, check that the mod is connected properly to your computer with a known-good cable and a stable USB connection. Have a quick look at the contacts and ports too. They should be clean and dry before you reconnect and try again.
If the device supports it, confirm that any required software update for modes like temperature control has been installed from the manufacturer’s site. If the mod still isn’t detected, contact VapeShop.bh’s 24/7 WhatsApp support.
Can a firmware update erase saved settings?
Yes, a firmware update can erase your saved settings.
So it’s smart to back up your device preferences and settings before you start the update. That way, you don’t lose your custom setup.
Related Blog Posts
- How to Swap Vape Mod Panels Easily
- How Fast-Charging Works in Vape Devices
- Checklist for Cloud Chasing Competitions
- How to Maintain Vape Mods for Peak Performance
Frequently Asked Questions
To update vape mod firmware safely, the device should be charged to at least 50%, the tank or atomiser removed, and a Windows PC with a proper data USB cable used. The correct firmware file must be downloaded from the maker’s own support page, matched to the exact mod model and revision, and the device must not be unplugged until the software shows a success message. After the update, settings like wattage, TC, TCR, and profiles are often reset to factory defaults, so they need to be re‑entered before normal use. The mod should be tested without a tank attached first to confirm menus, battery readings, and safety functions are working as expected.
Updating a vape mod has four simple parts: prepare the device, get the right files, run the update on a computer, and test the mod after it restarts. Preparation means checking the exact model and revision, confirming the current firmware version, charging to 50% or more, removing the tank, and backing up wattage, TC, TCR, and saved profiles. The right firmware must be downloaded only from the manufacturer’s support page and applied using its own update software on a Windows PC with a data USB cable. Once the updater reports success, the mod is disconnected, tested without a tank, and then its settings are restored.
Firmware updates mainly apply to vape box mods that are designed with upgradable software, while most other device types such as pod systems and disposable vapes do not support firmware flashing. If a device has no official firmware download or update tool on the maker’s support page, it is generally not meant to be updated. For supported mods, updates can fix menu bugs, screen lag, odd battery readings, and temperature control issues when done correctly. Users in Bahrain should always follow the manufacturer’s instructions and only use official files when updating a mod.
A proper firmware update can resolve issues such as buggy menus, laggy screens, inaccurate battery indicators, and temperature control problems on a vape mod. If something goes wrong, a bad update may leave the device stuck on the logo screen, erase saved profiles, or cause safety functions to stop working as expected. These risks are usually linked to using the wrong firmware file, interrupting power or USB connection mid‑update, or running unofficial software. Following the maker’s checklist and using only its official support tools greatly lowers the chance of failure.
When the updater cannot detect a vape mod, the most common causes are using a charge‑only USB cable or not putting the device into the correct update mode required by the manufacturer’s software. A proper data USB cable and a Windows computer are recommended, along with confirming the exact model and current firmware version before starting. It is also important to remove the tank or atomiser and make sure the battery is at least 50% charged so the mod stays powered during the update. If a flash fails, some makers may ask for the update date in DD‑MM‑YYYY format, such as 21‑08‑2026, to help with support.
Before updating, the vape mod should be charged to 50% or more, the tank or atomiser removed, and all current wattage, TC, TCR, and profile settings backed up. The exact device model and revision need to be checked, and the current firmware version confirmed so the correct file can be downloaded from the maker’s support page. A Windows PC with a proper data USB cable is used for the update, and the mod must not be unplugged until the success message appears in the software. After the restart, the device is tested without a tank attached to confirm that the firmware is stable and safety features behave as expected.
Updating vape mod firmware is generally safe when only the manufacturer’s own software and support files are used and the firmware is matched exactly to the device model and revision. The mod should be well charged, connected via a data USB cable to a Windows PC, and left plugged in until the updater confirms success to avoid corrupting the firmware. Because most updates reset settings to factory defaults, users should expect to re‑enter wattage, temperature control, TCR, and profile data afterward. Testing the mod without a tank first helps confirm safety functions and menus are working properly before regular use in Bahrain.