RTA Questions: Leaks, Dry Hits, Filling


RTA leaks, dry hits and flooding usually come down to wicking, seals, filling or power. Check wick placement and O-rings, leave an air gap when filling, and fully soak new cotton before use.
- Leaks: Check for gaps around the wick, damaged seals and overfilling.
- Dry hits: Check liquid flow, lower the wattage and pause between puffs. Let newly primed cotton soak for 5–10 minutes, or longer for thicker liquid.
- Gurgling after filling: Clear excess liquid as the manufacturer directs rather than repeatedly firing the tank.
- Worn parts: Replace scorched cotton or best vape coils based on condition, not a fixed schedule.
Stop using the device if liquid reaches electrical parts, resistance changes unexpectedly or a burnt taste persists after replacing and priming the cotton.
How to wick the Pioneer MTL RTA correctly & enjoy full flavour without leaking/gurgling or flooding.
sbb-itb-837e7ad
Why Your RTA Leaks
Start with three common leak points: wick tails, O-rings and fill level.
Too little cotton lets liquid slip past the wick and flood the chamber. Spread the tails evenly over the juice ports, keeping them loose enough for liquid to flow through.
Damaged or misplaced O-rings, loose parts and cross-threaded joints can all let liquid escape through a seal. More cotton won’t fix a seal leak.
Overfilling leaves too little air space. When you replace the top cap, it can push excess liquid into the chamber. Leave a small air gap and keep the liquid below the marked maximum. If you are new to rebuildables, our guide for first-time users covers basic setup and common mistakes. Keep the bottle nozzle out of the centre chimney: that’s the vapour passage, not a fill port.
If you can’t see where the leak starts, check the wick first, then the seals, then the fill area.
First Checks for Leaks
Empty the tank before taking it apart. Check the glass for cracks, then inspect the seals around the glass, deck, base, chimney, top cap and fill port. Reseat misplaced O-rings and replace damaged ones with the correct size.
Align the parts squarely when reassembling and hand-tighten only. Overtightening can distort the seals. If the seals and assembly are sound, re-wick any uneven or poorly placed tails.
Clear pooled liquid as the manufacturer directs, then wipe the tank dry so you can spot any new seepage. If liquid reaches the mod, battery area or contacts, stop using it. Disconnect the tank and dry it according to the manufacturer’s instructions. Replace any battery exposed to e-liquid immediately.
Why Cotton Burns and Dry Hits Happen
How to Prime RTA Cotton Safely
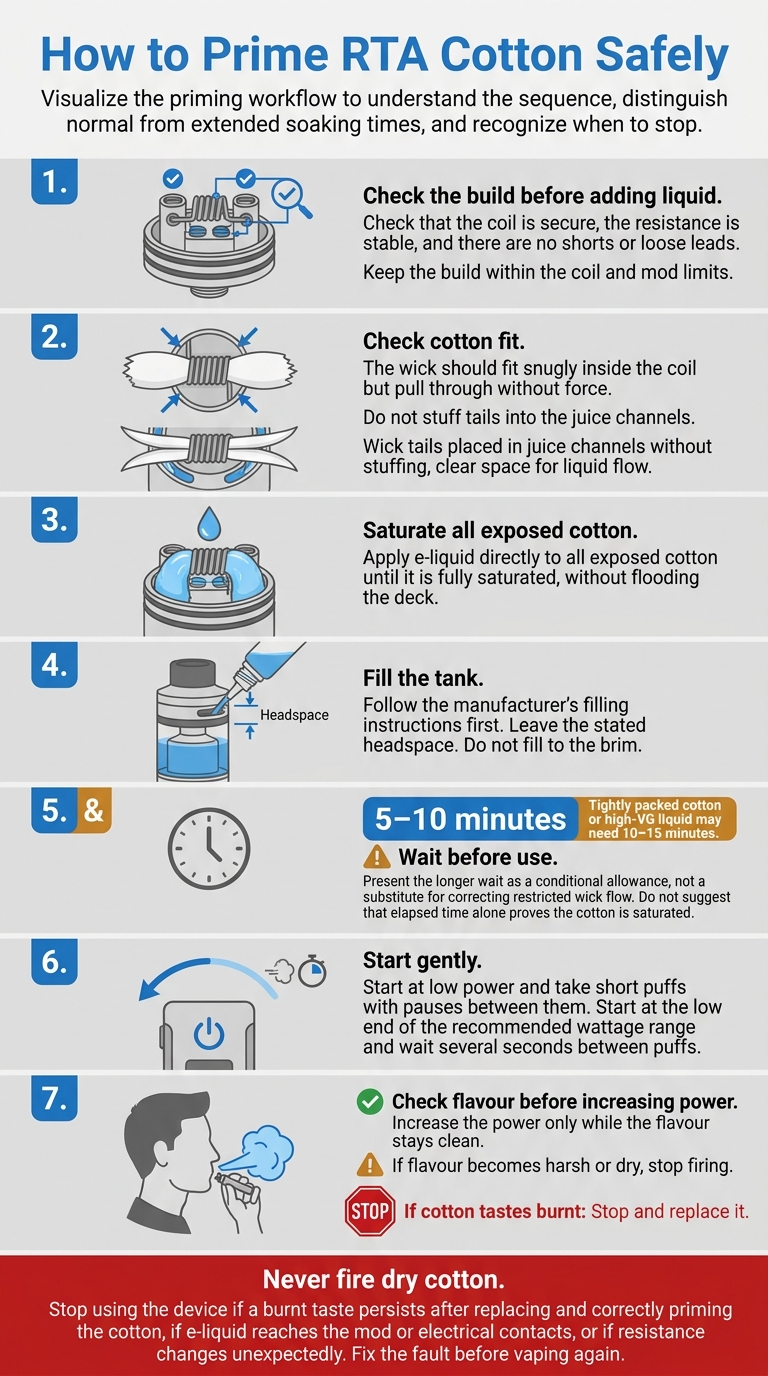
If the tank isn’t leaking, dry hits usually come down to wick flow or power. A dry hit happens when the coil uses liquid faster than the wick can supply it. Cotton packed too tightly, or tails stuffed into the juice channels, can block flow – even with a full tank. The wick should fit snugly inside the coil but pull through without force.
Power and puff timing matter too. Poor priming can leave dry patches in new cotton. Too much wattage, long draws and puffs taken close together can dry the wick before it has time to soak up more liquid. Start at the low end of the recommended wattage range and wait several seconds between puffs. Stop firing if the flavour turns harsh or dry.
Low liquid levels can expose the wick openings, especially when you tilt the tank. Refill before the liquid drops that far. Check the VG/PG ratio as well: thicker liquid moves more slowly through narrow cotton channels. A 70/30 VG/PG liquid may wick too slowly through narrow openings, while 50/50 may better suit tighter, higher-resistance designs like the Vandyvape BSKR V1.5 MTLRTA. Choose e-liquid that matches the tank’s stated compatibility.
How to Prime New Cotton
Fully soak new cotton before firing to avoid scorching it on the first use. Before adding liquid, check that the coil is secure, the resistance is stable, and there are no shorts or loose leads. Keep the build within the coil and mod limits. Apply e-liquid directly to all exposed cotton until it is fully saturated, without flooding the deck. Fill the tank and wait 5–10 minutes; tightly packed cotton or high-VG liquid may need 10–15 minutes.
Start at low power and take short puffs with pauses between them. Increase the power only while the flavour stays clean. Never fire dry cotton. If the cotton tastes burnt, stop and replace it.
How to Fill an RTA Without Flooding
Even well-primed cotton can flood if you fill the tank incorrectly. Follow the manufacturer’s filling instructions first. Only close the airflow or liquid-flow control if instructed. Open only the designated fill port, then fill slowly to let displaced air escape.
Leave the stated headspace. Do not fill to the brim.
Close the cap snugly without overtightening it. Wipe any liquid from the cap, tank and airflow openings. Reopen controls as instructed, keep the tank upright and let the wick saturate before use.
Why Your RTA Gurgles After Filling
Gurgling straight after a refill points to flooding, not a coil fault. It means excess liquid has entered the chamber or airflow path, which can cause spitback.
Stop firing, remove the tank and clear it according to the manufacturer’s instructions. Blot visible liquid with lint-free material. Check that the cotton covers the liquid inlets; re-wick if there are gaps. Do not repeatedly fire a flooded tank to clear it.
When to Replace Cotton and Coils
Recurring leaks, dry hits or flooding can mean the wick or coil is worn out.
Check condition, not the calendar. Replace parts when performance drops rather than on a fixed schedule. Sweet, dark or heavily flavoured liquids, higher power and frequent use all shorten their life. Inspect the build whenever flavour, vapour or wicking changes. Cotton usually needs replacing before the coil. An undamaged coil can often be cleaned and re-wicked several times.
Signs Your Cotton Needs Replacing
Switch off the device and disconnect the tank before removing cotton or working on the deck. Replace cotton that’s scorched or heavily fouled. Staining alone doesn’t mean it needs replacing, but soaking burnt cotton won’t restore it.
Signs Your Coil Needs Replacing
Disconnect the tank, then inspect the coil wire and posts. Replace the coil if the wire is damaged, distorted or loose at the posts, or if residue remains after cleaning. Don’t use the build if uneven heating, hot spots or unexpected resistance changes persist.
Follow the wire manufacturer’s cleaning guidance. Dry burning isn’t suitable for every coil, and you must never do it with cotton installed.
RTA Troubleshooting Checklist
Use this quick check when a problem returns after rewicking or refilling.
| Symptom | Likely cause | First fix |
|---|---|---|
| Airflow leak | Seal, fill-level or wick fault | Check O-rings, headspace and wick coverage at the juice ports. |
| Gurgling or spitback | Flooded chamber | Clear excess liquid as instructed; refill through the designated port below the fill limit. |
| Burnt taste | Dry or scorched cotton | Stop firing; check liquid flow and power, then replace and prime scorched cotton. |
| Weak flavour | Fouled build or incorrect settings | Check airflow and power, then inspect the cotton and coil. |
| Slow wicking | Restricted liquid flow | Check cotton density, tail placement and liquid compatibility. |
| Repeated dry hits | Wick cannot keep up | Check liquid level, lower power and pause between puffs. |
If the fault keeps returning, the build needs new cotton or a new coil.
Conclusion: Check Seals, Wicking, Filling and Power
Check seals, wicking, filling and power. Keep cotton snug, not tight, prime it thoroughly and avoid overfilling. Replace worn cotton or damaged coils.
Stop using the device if a burnt taste persists after replacing and correctly priming the cotton, if e-liquid reaches the mod or electrical contacts, if resistance changes unexpectedly, or if the coil, insulator, deck, glass or seals are damaged. Fix the fault before vaping again.
VapeShop.bh offers replacement coils, cotton and accessories with same-day delivery in Bahrain.
Related Blog Posts
- How to Build Coils for Competitive Cloud Chasing
- How to Prime Pod Coils and Avoid Mistakes
- How to Prime Vape Coil and Stop Dry Hits
- RTA vs RDA vs RDTA: Tank Comparison
Frequently Asked Questions
RTA leaks commonly come from gaps around the wick, damaged or misplaced O-rings, loose parts, cross-threaded joints, or overfilling. Check the wick tails and seals, keep the liquid below the marked maximum, and leave a small air gap during RTA filling.
Spread the wick tails evenly over the juice ports while keeping them loose enough for liquid to flow. Too little cotton can allow liquid to pass into the chamber and cause flooding, while too much can restrict liquid flow.
Check liquid flow, lower the wattage, and pause between puffs if dry hits occur. Newly primed cotton should soak for 5–10 minutes, or longer when using thicker liquid, before the device is used.
Open only the designated fill port and fill slowly, following the manufacturer’s instructions. Do not fill to the brim; leave a small air gap, close the cap snugly without overtightening, and allow the wick to saturate before use.
Fully soak newly installed cotton before firing the RTA. Let the primed cotton sit for 5–10 minutes, or longer for thicker liquid, to help reduce the risk of dry hits.
Flooding can result from insufficient wick coverage, overfilling, or excess liquid entering the chamber during cap replacement. If gurgling appears after filling, clear the excess liquid as the manufacturer directs instead of repeatedly firing the tank.
Inspect the O-rings around the glass, deck, base, chimney, top cap, and fill port for damage or incorrect placement. Replace worn seals when they no longer form a proper seal, and replace scorched cotton or coils according to their condition rather than a fixed schedule.
Stop using the device if a burnt taste continues after replacing and fully priming the cotton. Also stop if liquid reaches electrical parts or the resistance changes unexpectedly, then check the wick placement, liquid flow, and seals before further use.