Power Curve Guide for Vape Mods


If you already use a regulated mod, power curve mode lets you shape each puff instead of running one fixed wattage from start to end.
I’d boil the whole guide down like this: start with your coil’s mid-range wattage, keep all curve points flat first, then change one section at a time by 1–5 W. In most cases, the first 0.5–1.5 seconds controls ramp-up, the middle 1.5–3.0 seconds holds the main feel, and the last 1.5–2.0 seconds can be stepped down to cool the finish and lower dry-hit risk.
Here’s what matters most:
- Power curves change wattage during the puff
- Fixed wattage stays the same the whole time
- Higher wattage means more vapour, more heat, and more e-liquid use
- Lower wattage means a cooler, softer draw and less stress on the wick
- Most mods spread the curve across about 5 seconds
- Safe edits are usually small, around 1–5 W per point
- A late step-down of 5–10 W can help on longer draws
- In Bahrain’s hot weather, staying a bit lower can help the wick keep up
A simple way to think about it:
| Part of puff | Usual time | What it does | Common move |
|---|---|---|---|
| Start | 0.5–1.5 sec | Heats the coil | Small bump for faster ramp-up |
| Middle | 1.5–3.0 sec | Sets the main feel | Keep it flat and steady |
| End | 3.0–5.0 sec | Softens the finish | Step down to cut harshness |
I’d say power curve mode is best for people using sub-ohm tanks, RBAs, or larger coils that feel slow at the start or too hot at the end. If you use a pod, MTL setup, or you already like fixed wattage, you likely don’t need it.
Bottom line: keep every point inside the coil’s rated range, leave 20–30% battery headroom above the highest wattage point, and stop at once if you get a burnt, sharp, or scratchy hit.
That’s the full picture in short. The rest of the article explains how the curve works on-screen, what each point changes in a puff, and how I’d build a safe curve step by step.
Power Curves in Advanced Vape Mods Explained
A power curve is a programmed wattage profile that changes output during a puff instead of staying at one fixed setting. Different brands use different names for it – you might see "Wattage Curve" or "CCW" – but the idea is the same. On most mods, the profile shows up as a graph or a list of points.
On screen, it usually looks simple: time on one axis, wattage on the other. Each point controls one part of the puff. That matters because every point affects how the draw starts, builds, and ends.
How Power Curve Mode Differs from Fixed Wattage
Fixed wattage delivers the same power from start to finish. Set the mod to 40 W, and it stays at 40 W for the whole puff. That makes it easy to use, but it doesn’t let you shape the draw over time.
Power curve mode changes that. You can set a different wattage for each stage of the puff. Want a harder start and a softer finish? That’s exactly what the curve is for. If you set every curve point to the same wattage, the mod works like normal wattage mode.
Power curves also aren’t the same as temperature control (TC) mode. TC changes power on its own based on coil temperature. Power curves don’t do that. They simply follow the wattage pattern you set. That’s why they’re useful with standard Kanthal and Nichrome coils, where TC isn’t available.
How Mods Display Curve Settings
Mods can show curve settings in a few different ways:
- bars on a graph
- a short list of time-based steps
- percentage-based points
The layout may change from one device to another, but the function stays the same: the mod changes wattage over time during the puff. Once that clicks, moving between different menu styles gets a lot easier.
With that display format clear, the next section shows how each curve point changes wattage during a puff.
sbb-itb-837e7ad
How Curve Points Change Wattage During a Puff
Each curve point controls a short slice of the puff, usually 0.5 or 1.0 second. Most advanced mods run the full curve across about 5 seconds. Let go of the fire button early, and the later points never kick in. Hold it longer, and behaviour can change by device: some mods keep the last wattage, while others stop. The easiest way to read the curve is in three parts: early, middle, and late.
What Early, Middle, and Late Curve Points Do
A simple way to think about the curve is start, hold, and finish.
The early points – about the first 0.5–1.5 seconds – handle ramp-up. If you set the first point a bit above your usual wattage, such as 65 W for the first half-second and then drop to 55 W, the coil heats up faster. That gives you warmer vapour right away and a stronger throat hit. This can help a lot with larger, heavier coils that are slower to heat. In Bahrain’s warm weather, though, some users may find they don’t need such a strong preheat.
The middle points – roughly 1.5–3.0 seconds – are where the puff settles down. A flat stretch, such as 55 W across points 3 through 6, keeps output steadier. In plain terms, the coil stays at a more even heat level, which helps keep flavour and vapour density steady from one puff to the next. If the vape starts to feel harsh, burns the cotton, or goes through e-liquid too fast, trim the middle section by 5–10 W before touching the start or end.
The late points – after 3 seconds – work like a heat fade. A step-down pattern, such as 50 W to 45 W to 40 W over the last 1.5–2 seconds, cools the coil as the wick gets closer to its driest point. That can cut the risk of a dry hit and make the end of the puff feel cooler and smoother. For vapers in Bahrain who like longer, easier draws, this kind of taper can make the vape more comfortable and may help the coil last longer.
What Higher or Lower Wattage Changes in Practice
Turning wattage up at any point on the curve makes the coil heat faster. That usually means:
- more vapour
- warmer inhale temperature
- a stronger throat hit
- more e-liquid used per puff
It also means nicotine intake per puff goes up, even if the nicotine strength in the liquid stays the same.
Lower wattage moves things the other way. You get cooler vapour, a softer throat hit, and slower e-liquid use. A drop of 10–20 W on the same coil can make a noticeable dent in how fast you empty a bottle and can ease heat stress on the cotton.
That said, the result isn’t the same for every setup. Coil resistance, coil mass, airflow, and e-liquid composition all matter. A 0.15 Ω mesh coil reacts very differently from a heavier 0.4 Ω Clapton build. High-VG liquids need more heat to perform well, while salt nicotine and sweet dessert flavours often feel better on lower, smoother curves.
That’s the whole point of using a wattage curve: shaping the puff so it feels right, without driving the coil harder than it needs.
How to Build a Safe and Useful Power Curve
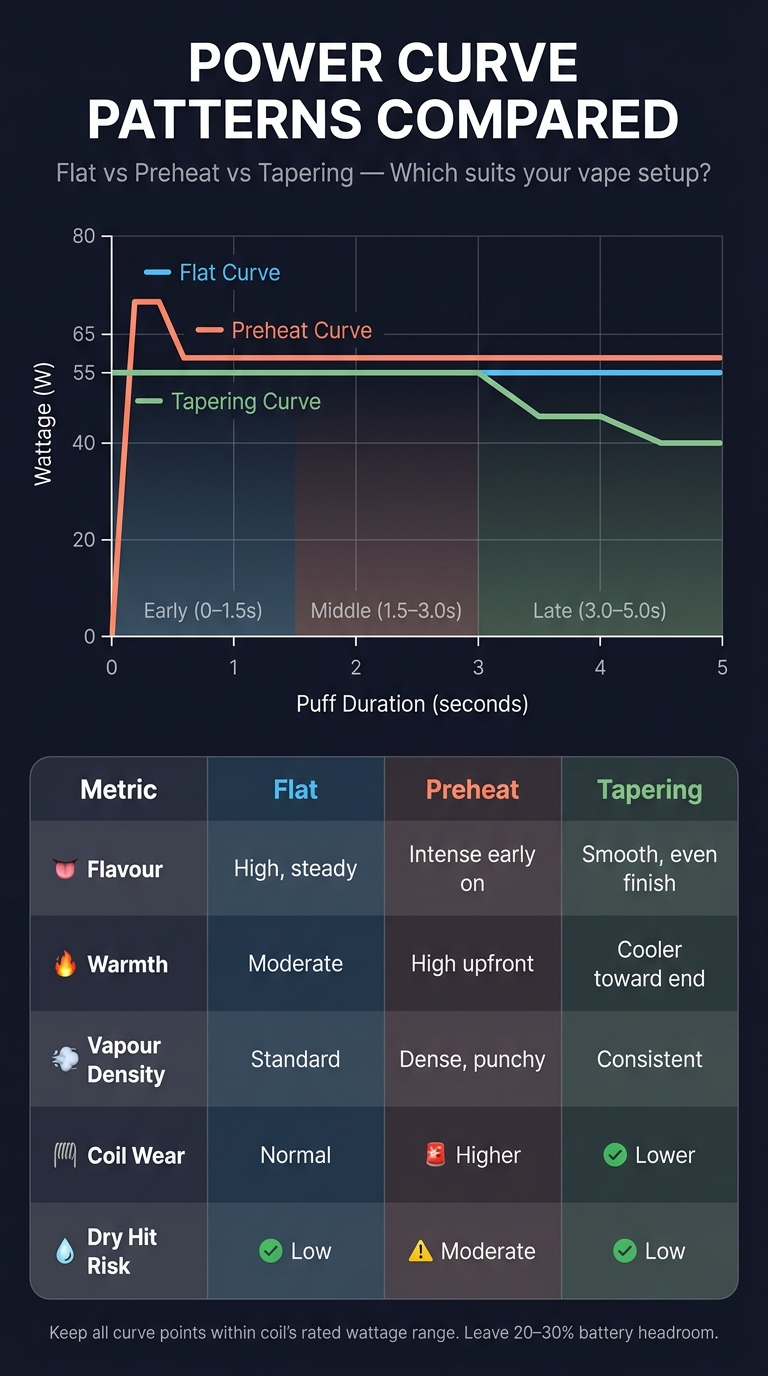
Vape Mod Power Curve Patterns: Flat vs Preheat vs Tapering Compared
Use wattage changes to build from a safe starting point. Begin in the middle of the coil’s rated wattage range, take 2–3-second puffs, and pay attention to flavour, warmth, and vapour.
Once you’ve got that starting point, switch your mod to power curve mode and set every point to the same wattage. Then make changes slowly. Adjust just one segment at a time in small steps, around 1–5 W, and test it before you change anything else.
3 Practical Curve Patterns to Try
Most setups only need three basic patterns. A flat curve keeps every point at the same wattage. That makes it the best place to start. A preheat curve lifts the first segment so the coil heats up fast, then drops back to your base wattage for the rest of the puff. A tapering curve starts near your preferred wattage and then steps down bit by bit near the end of the puff, which helps keep the finish cooler and smoother. It works well for longer draws.
These three patterns handle the most common tuning goals.
| Curve Pattern | Flavour | Warmth | Vapour Density | Coil Wear | Battery Use | Dry Hit Risk |
|---|---|---|---|---|---|---|
| Flat | High, steady | Moderate | Standard | Normal | Moderate | Low |
| Preheat | Intense early on | High upfront | Dense, punchy | Higher | High (initial burst) | Moderate |
| Tapering | Smooth, even finish | Cooler toward end | Consistent | Lower | Slightly reduced | Low |
Safety Checks Before Saving a Curve
After you pick a shape, check the limits before you save it. Keep every segment inside the coil’s rated range. Even a short spike above that ceiling can stress the cotton and cut coil life. Your battery CDR should stay above the curve’s highest power point, with 20–30% headroom.
While testing, watch for warning signs: a sharp, bitter, or burnt taste; a scratchy throat hit; or vapour that suddenly feels thin. Those signs usually mean one part of the curve is set too high. If that happens, stop, lower the harshest segment by a small amount, and test again.
In Bahrain’s warm climate, it’s smart to stay comfortably inside the coil’s rated range. Heat can thin e-liquid and change how well the wick keeps up.
Who in Bahrain Benefits Most from Manual Output Control
Best Fit: Advanced Mods, Larger Coils, and Fine-Tuning
Small wattage changes can make a big difference on setups that need a harder start or a gentler finish. That’s where power curves come in.
They suit experienced vapers who want more control over ramp-up and the last part of the puff. This matters most on sub-ohm tanks and rebuildables like the Vandyvape Pulse 24 RDA, where fixed wattage can feel a bit underpowered at the start and too harsh by the end.
Large coils that heat up slowly often work better with a short preheat followed by a lower hold. It’s a simple tweak, but it can change how the vape feels from start to finish.
Power curves also fit people who care a lot about flavour and those who want the same result across different coils or builds. If you swap setups often, that extra control can help keep things consistent.
Who Does Not Need Power Curve Mode
If your setup doesn’t call for that level of control, fixed wattage is usually enough.
Pod users, and anyone already happy with fixed wattage, often won’t get much from power curve mode. Mouth-to-lung users in particular tend to like the steady feel of fixed wattage, especially with nicotine salt or freebase e-liquids.
Conclusion: Key Rules for Better Curve Settings
Power curves are a fine-tuning tool. Use them only if you already know your coil, wattage range, and the kind of draw you like.
FAQs
How do I choose my starting wattage?
Match your wattage to the coil resistance in your device. If your mod has Smart Mode, it can spot the coil and suggest a suitable wattage range, which helps you avoid coil damage or that nasty burnt hit.
If you’re setting wattage by hand, start at the low end of the maker’s recommended range. Then bump it up in small steps until the warmth, intensity, and flavour feel right.
Can power curve mode improve flavour?
Yes. Power curve mode can improve flavour because it lets you control how the coil heats up across one puff.
For example, a higher wattage at the start can bring out flavour fast. Then a lower wattage for the rest of the puff can keep things steady and help stop the coil from getting too hot. That extra control can make more complex e-liquid notes stand out better than they would with fixed wattage.
What curve should I try first?
Start with a flat, neutral curve. It gives you a clear baseline for the vapour warmth and intensity you like.
Set your device at the lower end of your coil’s recommended wattage range first. Then move up bit by bit and pay attention to how each change affects flavour and throat hit.
If you’re new to vaping in Bahrain, a device with Smart Mode can suggest a good starting wattage while you learn.
Related Blog Posts
- Best Wattage for MTL vs. DTL Vaping
- How to Build Coils for Competitive Cloud Chasing
- Checklist for Cloud Chasing Competitions
- Beginner’s Checklist for Cloud Chasing
Frequently Asked Questions
Power curve mode lets the mod change wattage during each puff instead of holding one fixed wattage from start to finish. It usually spreads the curve across about 5 seconds, so you can shape the start, middle, and end of the draw to control vapour, heat, and dry-hit risk.
A simple setup is to start at your coil’s mid-range wattage, keep all curve points flat at first, then adjust one section at a time by around 1–5 W. The middle 1.5–3.0 seconds usually sets the main feel, so keeping this part steady and using a gentle step-down at the end can soften the finish.
The guide explains that the first 0.5–1.5 seconds of the puff mainly control coil ramp-up, which is where a small wattage bump can act like a preheat to get the coil up to temperature faster. After that, holding a stable wattage in the middle section keeps the vape feeling consistent before tapering down at the end.
The guide is described as most useful for sub-ohm tanks, rebuildable atomizers (RBAs), or larger coils that feel slow at the start or too hot at the end. By using a small boost at the beginning and a step-down of about 5–10 W on longer draws, the curve can make dense sub-ohm pulls feel more controlled.
The guide suggests that the last 1.5–2.0 seconds of the puff can be stepped down to cool the finish and lower dry-hit risk. A late step-down of 5–10 W on longer draws reduces heat and stress on the wick, which is especially helpful in hot weather where e-liquid supply to the coil can struggle.
Fixed wattage keeps the same power throughout the puff, while power curves let you tailor the start, middle, and end so the vape feels less harsh and uses e-liquid more predictably. The guide notes that in Bahrain’s hot weather, staying a bit lower on the curve can help the wick keep up and reduce dry hits.
Safe edits in the guide are usually small, around 1–5 W per curve point, starting from the coil’s mid-range wattage. Keeping changes gradual and using a gentle tapering down at the end of a 3–5 second puff helps manage heat, cuts harshness, and limits stress on the wick.