
Beginner’s Guide to Pod Systems


If I’m new to pod systems, the basic routine is simple: charge the device, check the pod, fill it the right way, wait 5–10 minutes, then take slow 2–3 second draws. That one wait time does a lot to help stop burnt hits and early coil damage.
If I want the shortest setup, I go with a closed pod. If I want to refill with my own e-liquid, I use a refillable pod. In Bahrain, that also means I need to think about heat, because summer temperatures can go above 40°C, and heat can make pods leak.
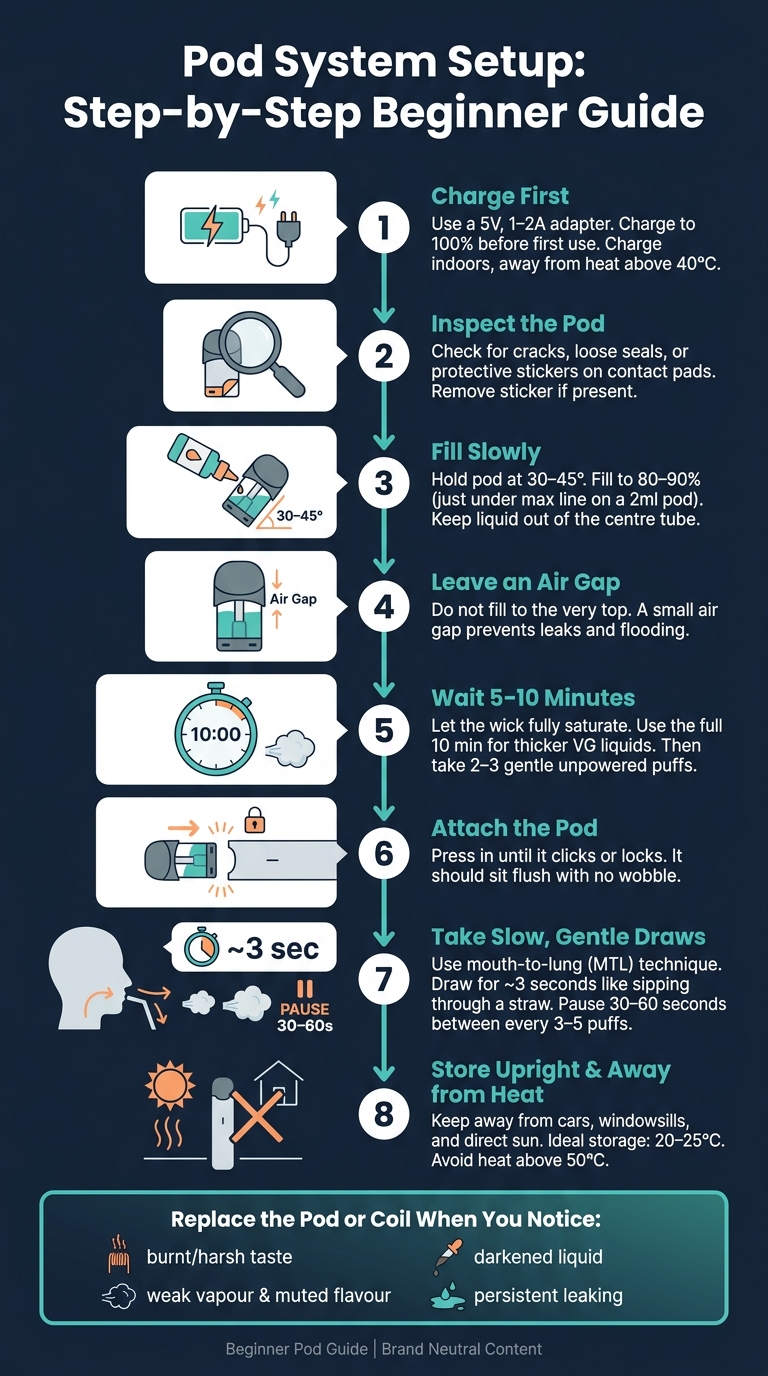
Here’s the full process at a glance:
- Charge first using a 5 V, 1–2 A source
- Check the pod for cracks, loose seals, or protective stickers
- Fill slowly and keep liquid out of the centre tube
- Leave a small air gap instead of filling to the very top
- Wait 5–10 minutes after filling a new pod
- Start with gentle puffs, not hard pulls
- Store upright and keep it away from sun, hot cars, and windows
- Replace the pod or coil when flavour drops, vapour gets weak, or the taste turns burnt
For a fast side-by-side look, here’s the main difference between the two pod types:
| Pod type | Setup | Refilling | Upkeep | Best for |
|---|---|---|---|---|
| Closed pod | Very easy | No | Low | Adults who want the least effort |
| Refillable pod | A few more steps | Yes | Medium | Adults who want more flavour choice and cost control |
The short version: if I fill carefully, wait the full 5–10 minutes, and use slow mouth-to-lung puffs, I give myself the best shot at a smooth first use. The rest is just small habits like wiping contacts, avoiding heat above 50°C, and not letting the pod run too low.
Pod System Setup: Step-by-Step Beginner Guide
Vaping 101 – Uwell Marsupod Beginners Guide
sbb-itb-837e7ad
Pod System Basics
A pod system is a small vaping device with a rechargeable battery and a removable pod that holds e-liquid and a coil. The battery powers the coil, and the coil heats the liquid into vapour that you inhale through the mouthpiece. A lot of beginner-friendly pod systems are draw-activated, which means the device turns on when you inhale. No buttons, no fuss.
Before you use one for the first time, it helps to know what type of pod system you have. Then check both the battery and the pod.
Closed Pods vs Refillable Pods
The first big choice is between a closed (prefilled) pod system and a refillable (open) pod system. Closed pods come sealed and get replaced when they’re empty. Refillable pods have a fill port, so you can add bottled e-liquid yourself.
| Feature | Closed (Prefilled) Pods | Refillable Pods |
|---|---|---|
| Setup difficulty | Very easy – insert pod and vape | Moderate – fill, wait, then vape |
| Maintenance | Low – replace pods and charge | Medium – refill and occasionally clean |
| Refilling | None; discard when empty | You refill through a side or bottom fill port |
| Best use case | Convenience-first, minimal effort | Custom flavours, cost control, flexibility |
If you want the simplest route, closed pods make life easy. You don’t handle e-liquid, and flavour output tends to stay steady from pod to pod. If you want more flavour options and better control over running costs, a refillable pod kit may suit you better.
Main Parts to Know Before You Start
You don’t need to learn every last part before your first vape. Just get familiar with the bits you’ll use during setup and day-to-day use:
- Battery – the main unit you hold, charge, and turn on or off.
- Pod – the cartridge you insert, remove, refill (on open systems), and replace over time.
- Mouthpiece – built into or attached to the pod; wipe it with a clean tissue when needed.
- Fill port – on refillable pods only; a small silicone-sealed opening where you add e-liquid.
- Coil – the heating element inside the pod; on most closed pod systems it is sealed inside and replaced with the pod.
- Contacts – small metal terminals on the pod base and inside the device; wipe with a dry cloth if e-liquid builds up.
- Charging port – usually USB-C on modern devices; keep it free of dust and moisture.
- Airflow control (if present) – a small slider or dial to adjust draw tightness; set it how you like.
Modern pod devices also come with built-in safety features that help guard against overcharging, short circuits, and deep battery drain.
Once you know these parts, the next step is to charge the device and inspect the pod before filling.
Charge and Inspect the Device
Charge Fully Before First Use
Most pod systems arrive with only a partial charge, usually around 40–60%. Before you use yours for the first time, charge it to 100%.
Use the cable that came with the device and plug it into a 5 V, 1–2 A wall adapter or a laptop USB port. Skip fast chargers unless your device says it can handle them. In Bahrain’s summer heat, where temperatures often go above 40°C, charge the device indoors and keep it out of direct sunlight. Put it on a flat, hard, fire-resistant surface.
A lit or pulsing light usually means the device is charging. A 100% reading or no light usually means it’s full. Once it’s charged, unplug it. Don’t leave it charging overnight.
When the battery is full, move on to the pod and contact check before filling.
Check the Pod, Contacts, and Charging Port
Before adding anything, give the pod and contact points a close look.
Check for cracks, warped plastic, or loose fill-port seals. If a pod looks damaged, replace it right away so e-liquid doesn’t leak into the battery compartment.
Look at the bottom of the pod too. Some devices ship with a protective sticker or film over the metal contact pads. It’s there to stop accidental firing during shipping, but it must come off before use. If it’s still attached, the device may not detect the pod or fire the way it should.
Wipe the pod base and the device contacts with a dry tissue or cotton swab. That helps clear condensation and keeps the connection steady. Then inspect the charging port under bright light for lint or dust. Use a soft, dry brush if it needs cleaning. Never put metal tools or liquids inside the port.
If your device has a fire button, turn it on now. High-quality options like the SEKURUS Dare Kit often feature these intuitive controls. Press it five times and look for a brief LED flash or screen animation to show it’s ready.
Fill and Prime the Pod
How to Fill the Pod: Step by Step
Once the pod is clean and checked, fill it slowly. Take the pod out before you start, and place a tissue underneath to catch any stray drops.
Find the fill port. It’s often covered by a silicone plug or a sliding cap under the mouthpiece. Open it gently so you don’t pull or warp the seal. And one thing matters here: don’t fill the centre tube. That’s a fast way to end up with flooding, gurgling, spitting, and leaks.
Hold the pod at a 30–45° angle, place the e-liquid nozzle against the inner wall, and squeeze with a light hand. Fill it to about 80–90%, or just under the max line on a 2 ml pod. Leave a small air gap at the top. After that, press the silicone plug back in until it sits flush, then wipe the outside dry with a tissue.
Prime the Coil and Wait 5–10 Minutes
Priming gets the wick wet before heat hits it. Miss this step, and that first puff can taste burnt.
Never fire a dry coil. A dry wick can burn in no time.
If the coil is replaceable, add 3–4 drops to the visible cotton openings before you put it together. With fixed-coil pods, the wait does that job for you.
After filling, stand the pod upright and wait 5–10 minutes. If you’re using a thicker liquid with more VG, give it the full 10 minutes. Then take 2–3 gentle unpowered puffs to help pull the liquid into the coil.
Attach the Pod Correctly
Once the wait is over, press the pod in until it clicks or locks in place with the magnets. It should sit flush, not wobble or lean to one side. If the pod is loose, the contact can be poor and the device may not read it properly.
Before the first puff, have a quick look for leaks. If you spot any liquid, wipe the pod base and the device contacts dry, then put the pod back in.
With the pod seated properly, it’s ready for your first slow draw.
Taking Your First Puffs
Use Slow, Gentle Draws
Once the coil has soaked, start with the lightest draw you can. A lot of first-time users pull far too hard, mostly out of habit from cigarettes. Here, that tends to backfire.
Most pod systems are built for mouth-to-lung (MTL) inhalation. That means you draw vapour slowly into your mouth for about 3 seconds – think of it like a slow sip through a straw – then inhale it into your lungs and exhale. For most pod systems, that’s the standard way to use them. For a broader look at the transition, see our vaping for beginners guide.
This becomes even more important with nicotine salt or freebase e-liquids, which are common in pod systems. If you take a hard, fast pull, you get too much vapour at once. That can lead to a harsh throat hit, coughing, or even dizziness. A softer draw keeps the experience smoother and easier to control. After 3-5 puffs, give it a break for 30-60 seconds before going again.
If you hear gurgling or notice small droplets of liquid in your mouth, that’s called spitback. It usually means you’re pulling too hard. Ease up and shorten the draw to about 2 seconds.
Auto-Draw, Button Use, and Airflow
Auto-draw devices activate as soon as you inhale. No buttons, no setup. Just place the mouthpiece between your lips with a light seal and draw gently. Don’t blow into the device, and don’t yank hard on it. Either one can flood the coil or trigger the air sensor the wrong way.
Button-activated devices give you a bit more control. Press and hold the button a split second before you inhale, take a smooth draw, then let go of the button just before you finish. Many button devices can also be locked, which helps stop accidental firing in a pocket or bag.
If your device has adjustable airflow, start in the middle. Then change it one notch at a time until the draw feels right.
| Airflow Setting | Draw Feel | Vapour Warmth | Throat Hit | Best For |
|---|---|---|---|---|
| Tighter | Restricted, cigarette-like | Warmer | Stronger | Nicotine salts, MTL beginners |
| Middle | Balanced | Moderate | Moderate | Finding your preference |
| Looser | Airier, more open | Cooler | Softer | Lower nicotine, sensitive throat |
That gives you a steady starting point before routine cleaning and pod replacement.
Care, Replacement, and Next Steps
Once the pod is part of your daily use, a few small habits can keep the flavour clean and help stop leaks.
Routine Care to Reduce Leaks and Keep Flavour Clean
After each use, wipe the mouthpiece. Every few days, clean the contacts on both the pod and the device with a dry cotton swab.
Refill the pod when it’s about one-quarter full. Store the device upright in a cool, dry place. Keep it away from parked cars, windowsills, and direct sun. Heat above 50 °C can thin the e-liquid and lead to leaks. For indoor storage, 20–25 °C is the best range.
If cleaning and refilling stop making a difference, it’s time to change the pod or coil.
When to Replace the Pod or Coil
Don’t replace it by the calendar. Replace it when performance starts to slip. Here’s what to watch for:
- A burnt, harsh, or charred taste that doesn’t go away after checking the fill level
- Weaker vapour and muted flavour than before
- Darkened liquid inside the pod
- Persistent leaking even after wiping the contacts, storing the device upright, and not overfilling
If you notice mild gurgling or spit-back just after a refill, clean the contacts and take a few light draws.
Conclusion: The Basic Routine to Follow Every Time
The routine is simple: charge first, check the pod and contacts, fill carefully and leave a small air gap at the top, prime for 5–10 minutes, take slow and gentle draws, wipe the mouthpiece and contacts often, store the device upright and away from heat, and replace the pod or coil when performance drops.
If you need replacement pods, coils, or e-liquids in Bahrain, you can order from VapeShop.bh with same-day delivery and WhatsApp support.
FAQs
Which pod system is best for beginners?
For beginners in Bahrain, the best pod systems are small, draw-activated, and built for MTL vaping, which feels close to smoking.
Good beginner-friendly picks for 2026 include the Vaporesso XROS 5 and OXVA XLIM series. Go for a simple, reliable, leak-resistant device with 1.0-ohm or higher coils for a smoother throat hit with nicotine salts.
Why is my pod system leaking?
Leaking usually comes down to how the pod is filled, stored, or put together. Don’t fill it right to the top – leave a small air gap. It also helps to check that the coil is fitted properly and that the fill port is closed tightly.
Bahrain’s heat can make e-liquid thinner, which means it may seep through the vents more easily. Store your device upright in a cool, shaded place, and don’t leave it in a hot car. If you need help or replacement parts, you can contact VapeShop.bh via WhatsApp.
How do I know when to replace the pod or coil?
Most coils last about 5 to 14 days. The exact lifespan depends on how often you vape and how sweet your e-liquid is.
It’s time to replace the pod or coil if you notice:
- a burnt or off taste
- muted or flat flavour
- less vapour
- persistent gurgling or leaking
- unusually dark e-liquid
Related Blog Posts
- كيفية اختيار الفيب المناسب للمبتدئين
- مقارنة بين أجهزة البود والمود المتقدمة
- How to Replace Coils in Pod Systems
- How to Choose the Right Vape Device
Frequently Asked Questions
For a basic pod setup, start by fully charging the device using a 5 V, 1–2 A power source so it has a stable power output. Then check the pod for any cracks, loose seals, or protective stickers before filling slowly and keeping e-liquid out of the centre tube to avoid gurgling and leaking.
Leave a small air gap instead of filling right to the top, wait 5–10 minutes so the coil can soak properly, then take gentle 2–3 second draws rather than hard pulls.
Closed pods have the shortest and simplest pod setup: they are very easy to use, require no manual refilling, and have low upkeep, which suits adults who want the least effort. Refillable pods need a few more steps, including careful filling and regular checks, but they allow refilling with your own e-liquid and offer more flavour choice and cost control.
Both pod types work with the same basic routine of charging, checking seals, filling correctly, waiting 5–10 minutes, and taking slow mouth-to-lung puffs.
With refillable pods, always fill slowly and keep liquid out of the centre tube so air can flow properly and the coil doesn’t flood. Leave a small air gap instead of filling right to the very top, then wait 5–10 minutes after the first fill to let the pod absorb enough liquid, which helps prevent burnt hits and early coil damage.
Once the wait time is done, start with gentle 2–3 second mouth-to-lung draws and store the device upright when you are not using it.
A simple pod maintenance routine is to charge with a 5 V, 1–2 A source, check the pod regularly for cracks or loose seals, and wipe the contacts so they stay clean. Replace the pod or coil when flavour drops, vapour gets weak, or the taste turns burnt, as these are signs the pod is worn out.
Storing the device upright and keeping it away from direct sun, hot cars, and windows also helps keep pods in good condition over time.
Because summer temperatures in Bahrain can go above 40°C, heat can make pods leak if they are left in hot cars, direct sun, or near windows. Storing the pod system upright and away from strong heat sources, combined with careful filling that leaves a small air gap, helps reduce pressure build-up inside the pod.
Checking seals for damage and keeping liquid out of the centre tube are additional leak prevention steps that support more reliable use in hot conditions.
Pod systems in this guide use a very simple form of coil priming: once the pod is filled correctly, waiting 5–10 minutes allows the coil to soak fully before the first use. This single wait time does a lot to reduce the chance of burnt hits and early coil damage.
After priming, begin with gentle 2–3 second pulls instead of hard puffs, which puts less stress on a fresh coil and keeps the vape more consistent.
For mouth-to-lung vaping with a pod system, the recommended routine is to take slow 2–3 second draws, holding the vapour in your mouth first and then inhaling, similar to a traditional cigarette. Hard pulls can cause flooding or burnt hits, especially on a fresh pod.
If this draw style is combined with proper setup steps like careful filling, a 5–10 minute wait after filling, and upright storage, it gives a smoother first use and more consistent performance.